
← Back to Support EZCODE / SUPPORT
DM4P
Compact wireless barcode scanner
Setup guide2.4G receiver / Bluetooth BLE-HID / USB
Manual V22-(2.4+LY)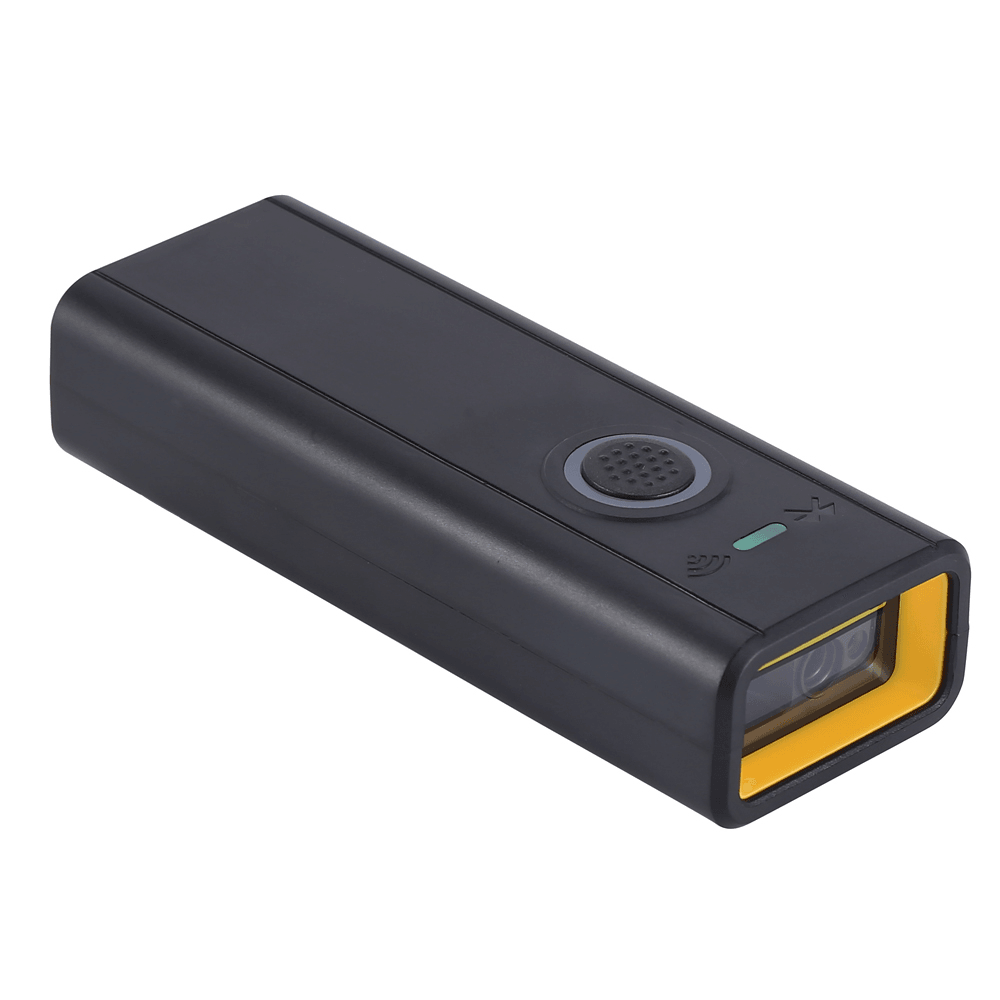 Scan only the setting you need. Use your scanner, not your phone camera. Codes are alternatives unless a sequence is stated.
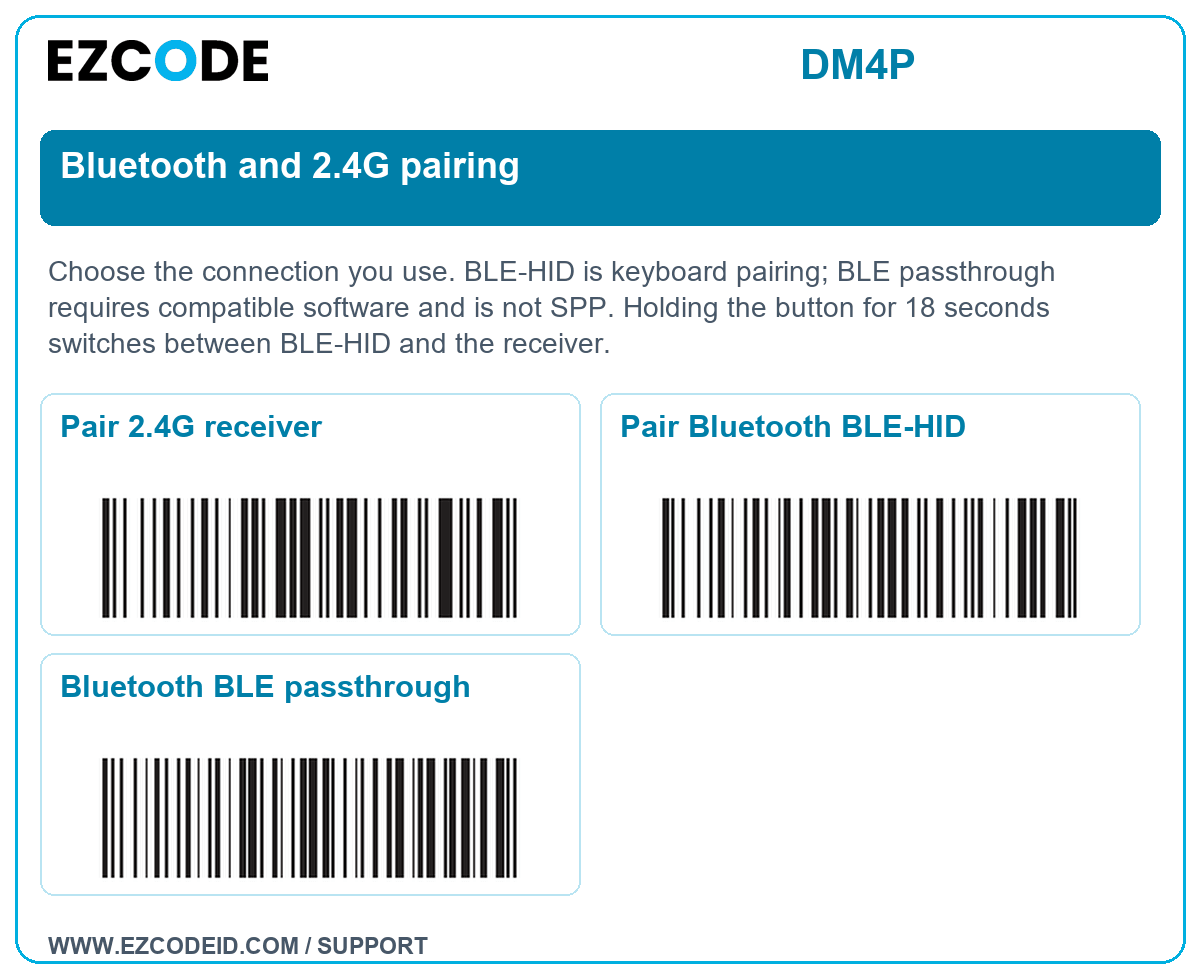
Save to your phone: open a group image, then touch and hold to save it. Enlarge the image or print it if a code is difficult to scan.Bluetooth and 2.4G pairing
Choose the connection you use. BLE-HID is keyboard pairing; BLE passthrough requires compatible software and is not SPP. Holding the button for 18 seconds switches between BLE-HID and the receiver.
Open / save bluetooth and 2.4g pairing image ↗Pair 2.4G receiver
Pair Bluetooth BLE-HID
Bluetooth BLE passthrough
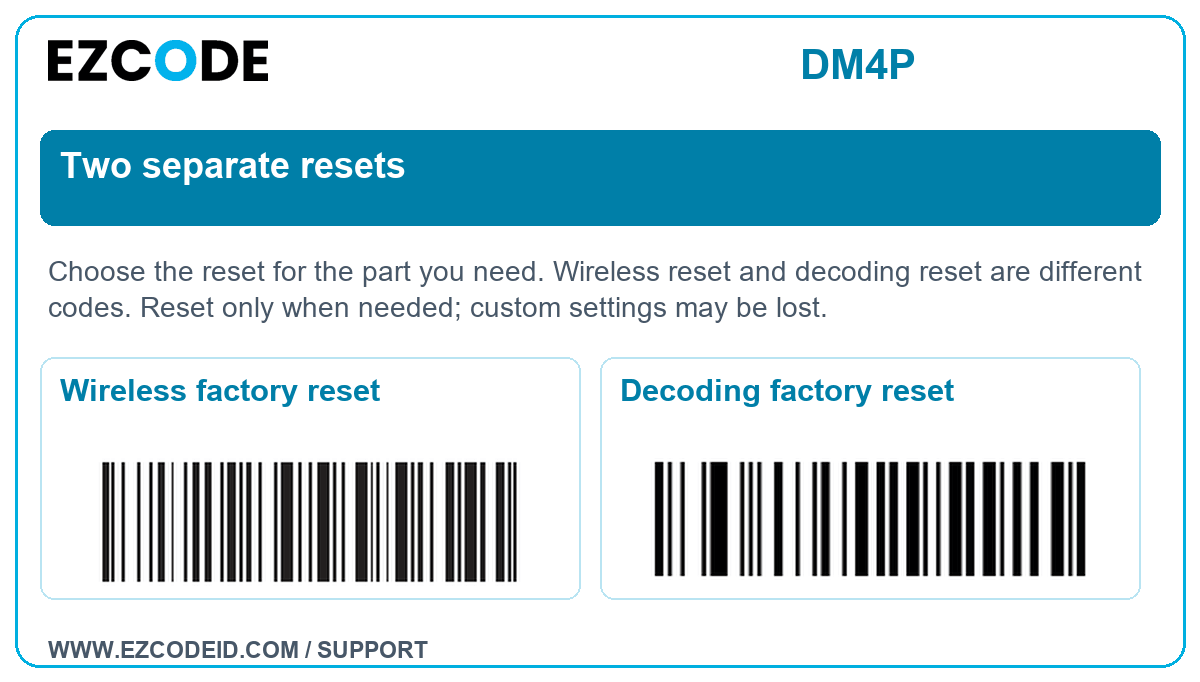
Two separate resets
Choose the reset for the part you need. Wireless reset and decoding reset are different codes. Reset only when needed; custom settings may be lost.
Open / save two separate resets image ↗Wireless factory reset
Decoding factory reset
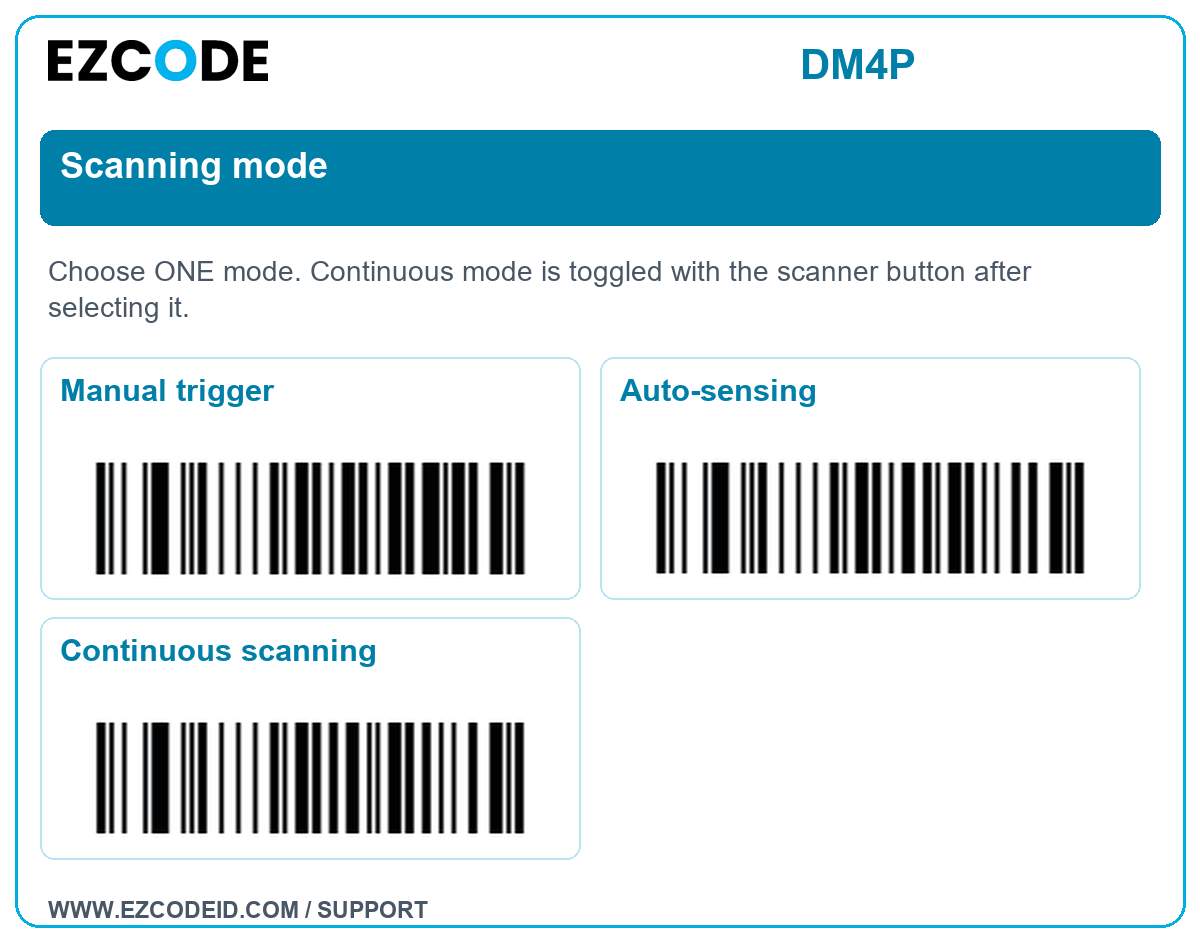
Scanning mode
Choose ONE mode. Continuous mode is toggled with the scanner button after selecting it.
Open / save scanning mode image ↗Manual trigger
Auto-sensing
Continuous scanning
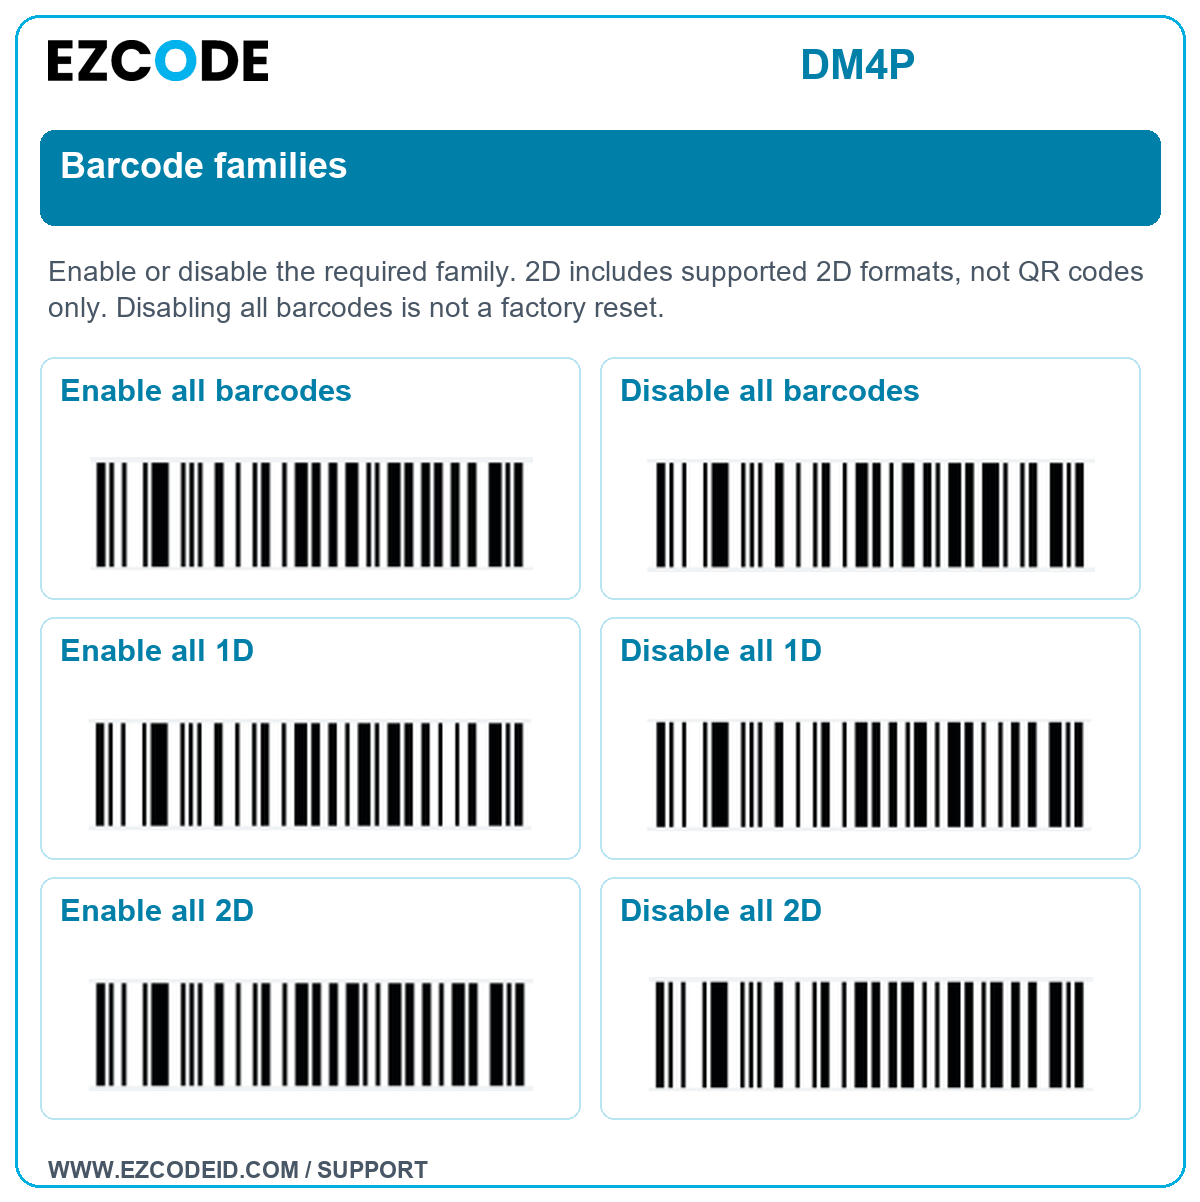
Barcode families
Enable or disable the required family. 2D includes supported 2D formats, not QR codes only. Disabling all barcodes is not a factory reset.
Open / save barcode families image ↗Enable all barcodes
Disable all barcodes
Enable all 1D
Disable all 1D
Enable all 2D
Disable all 2D
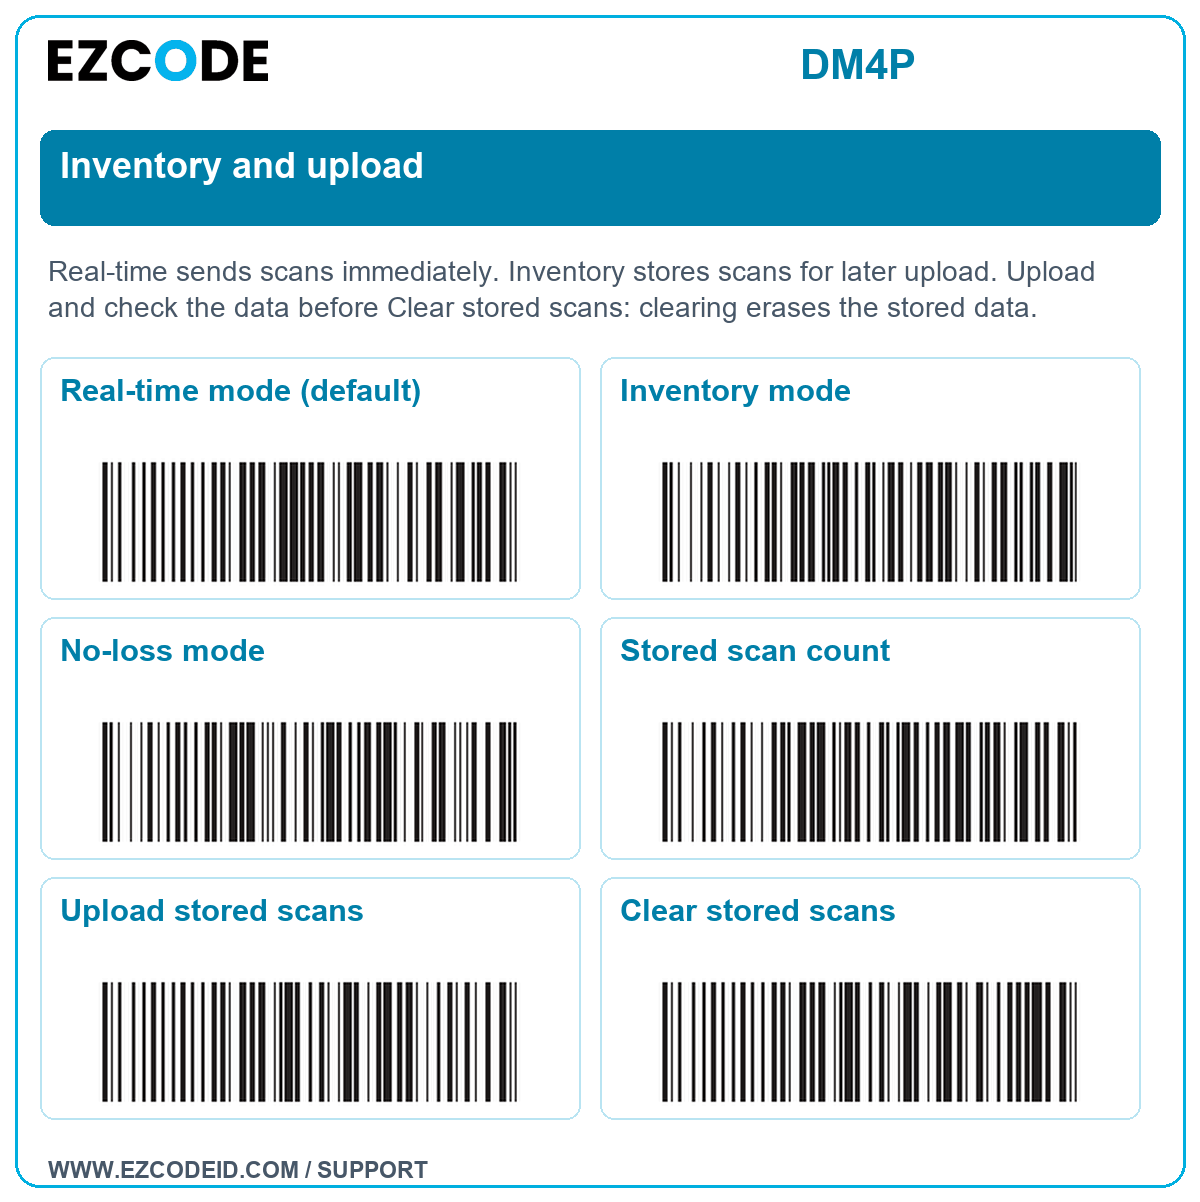
Inventory and upload
Real-time sends scans immediately. Inventory stores scans for later upload. Upload and check the data before Clear stored scans: clearing erases the stored data.
Open / save inventory and upload image ↗Real-time mode (default)
Inventory mode
No-loss mode
Stored scan count
Upload stored scans
Clear stored scans
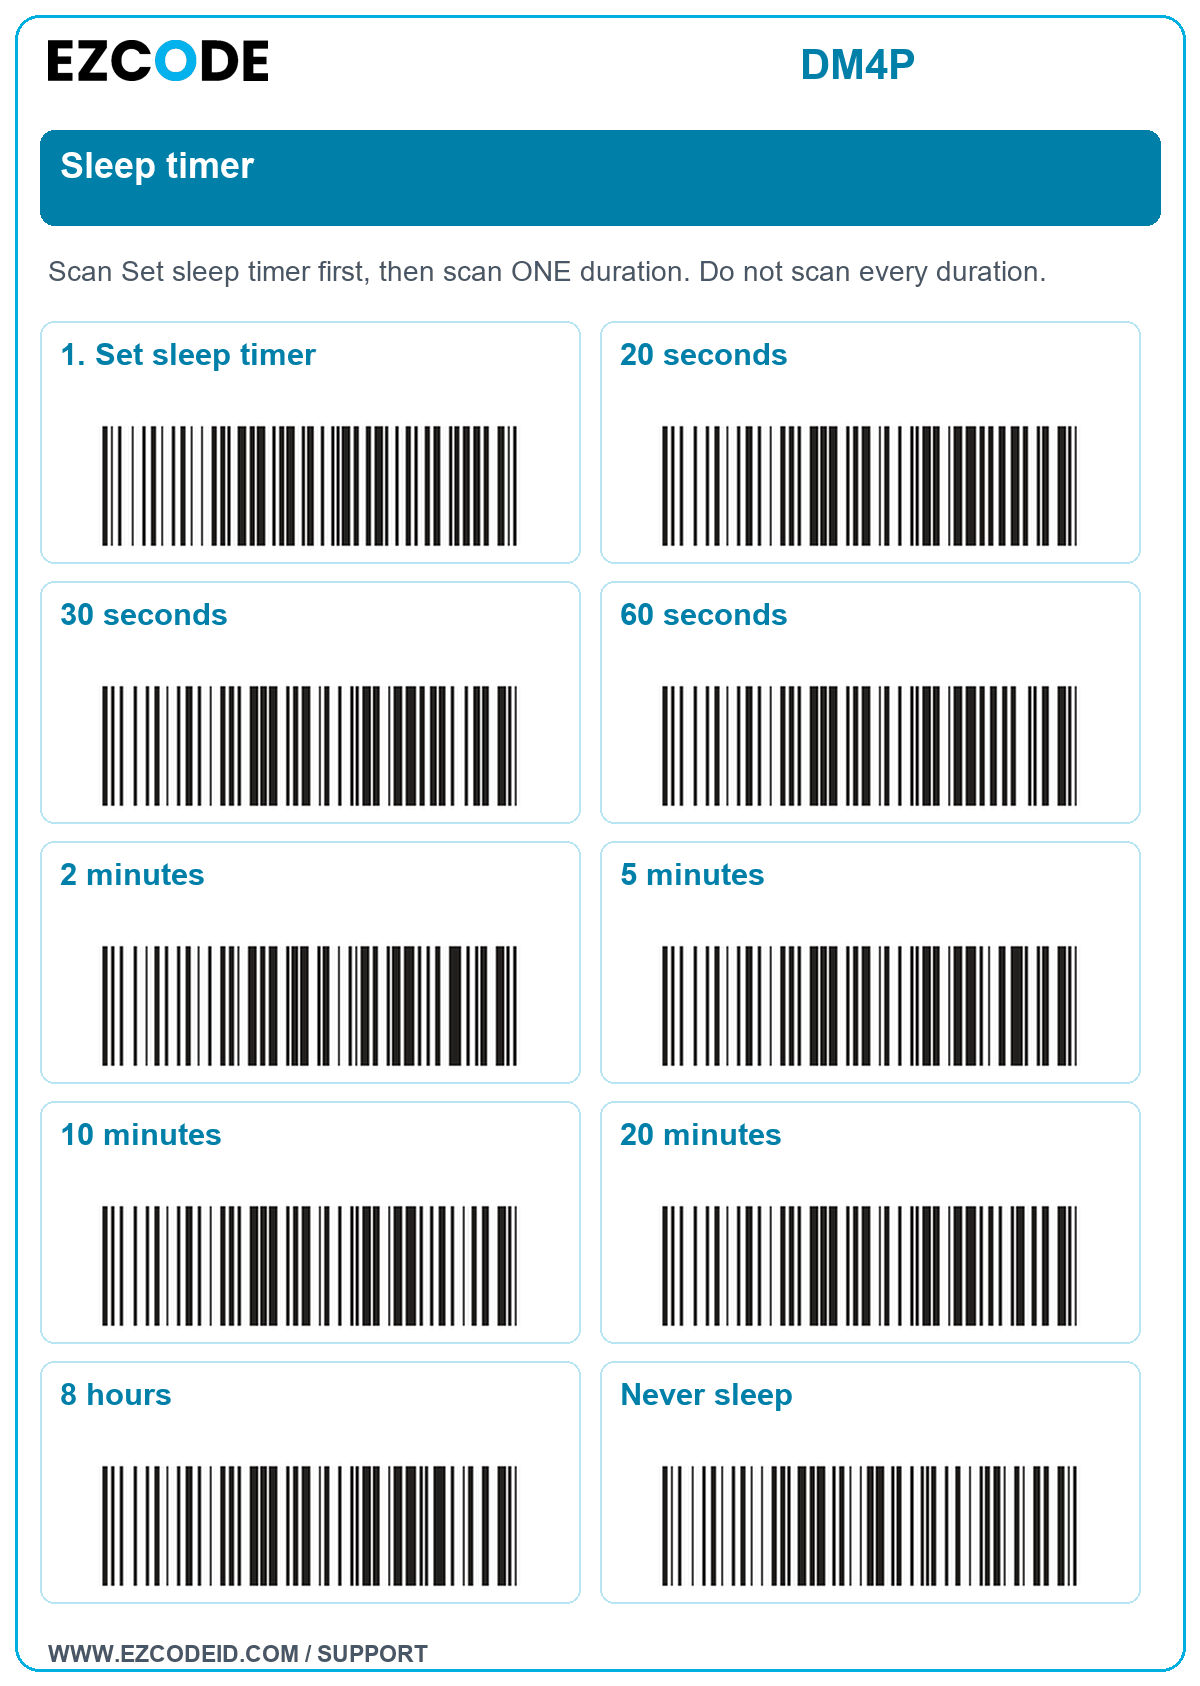
Sleep timer
Scan Set sleep timer first, then scan ONE duration. Do not scan every duration.
Open / save sleep timer image ↗1. Set sleep timer
20 seconds
30 seconds
60 seconds
2 minutes
5 minutes
10 minutes
20 minutes
8 hours
Never sleep
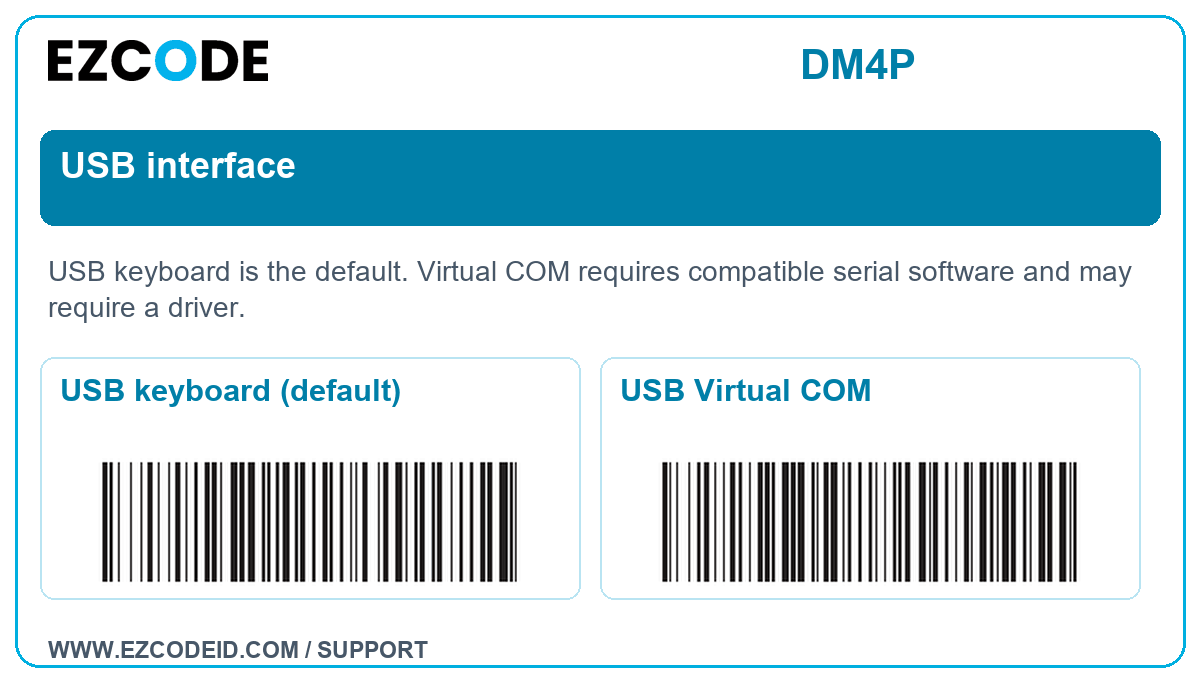
USB interface
USB keyboard is the default. Virtual COM requires compatible serial software and may require a driver.
Open / save usb interface image ↗USB keyboard (default)
USB Virtual COM
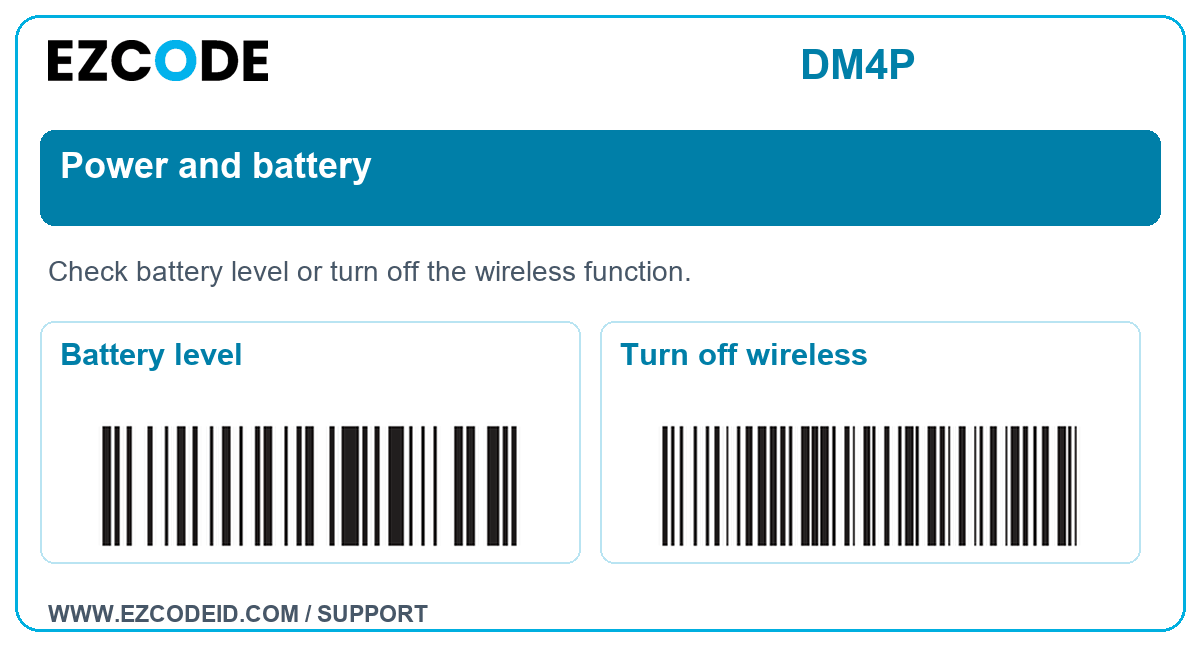
Power and battery
Check battery level or turn off the wireless function.
Open / save power and battery image ↗Battery level
Turn off wireless
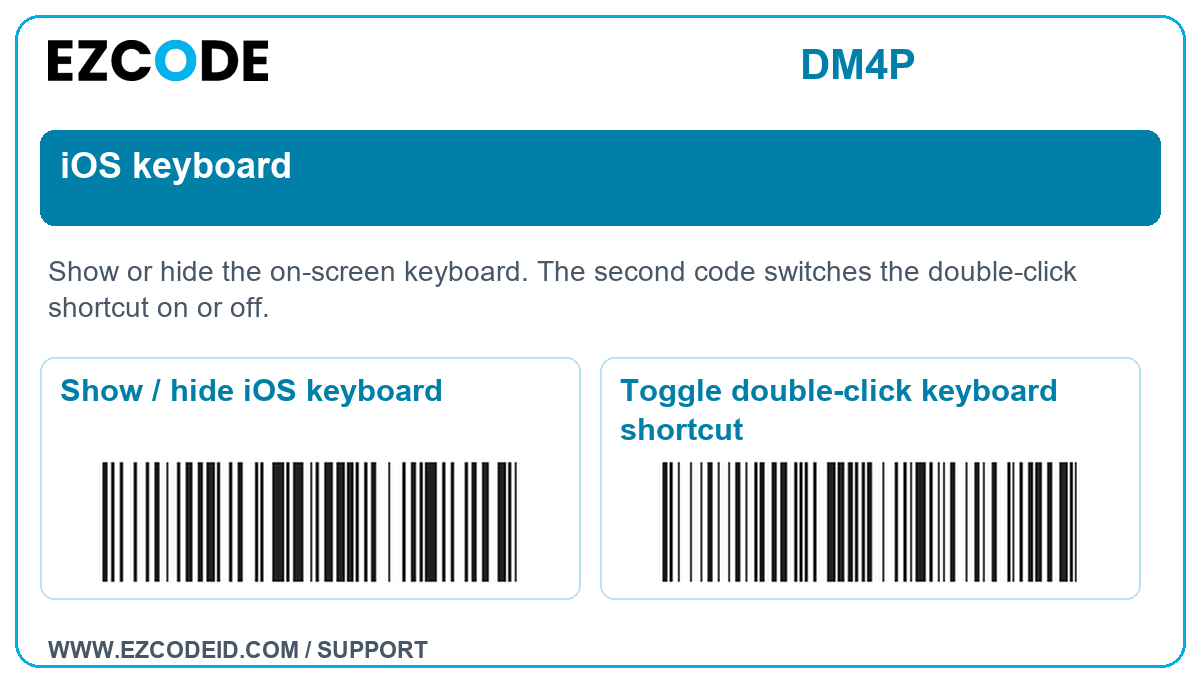
iOS keyboard
Show or hide the on-screen keyboard. The second code switches the double-click shortcut on or off.
Open / save ios keyboard image ↗Show / hide iOS keyboard
Toggle double-click keyboard shortcut
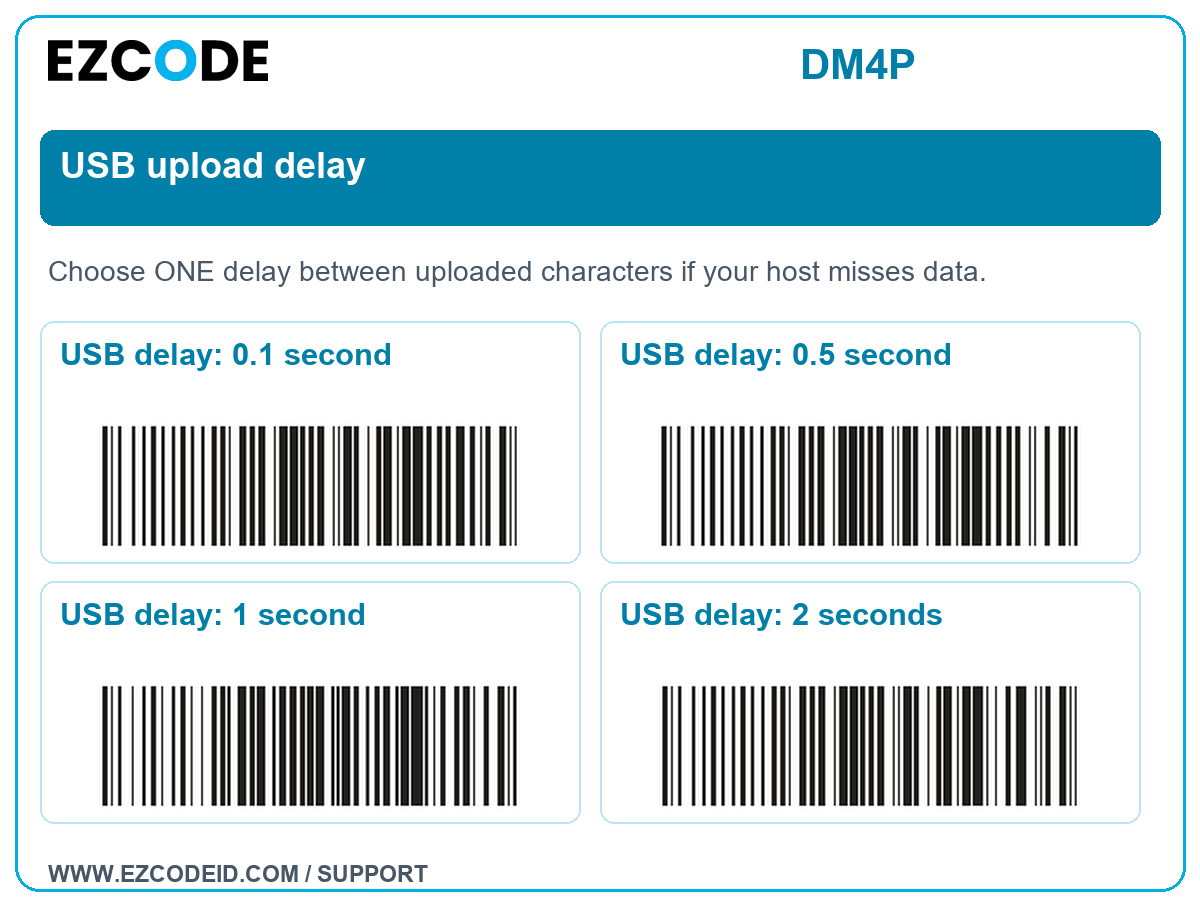
USB upload delay
Choose ONE delay between uploaded characters if your host misses data.
Open / save usb upload delay image ↗USB delay: 0.1 second
USB delay: 0.5 second
USB delay: 1 second
USB delay: 2 seconds
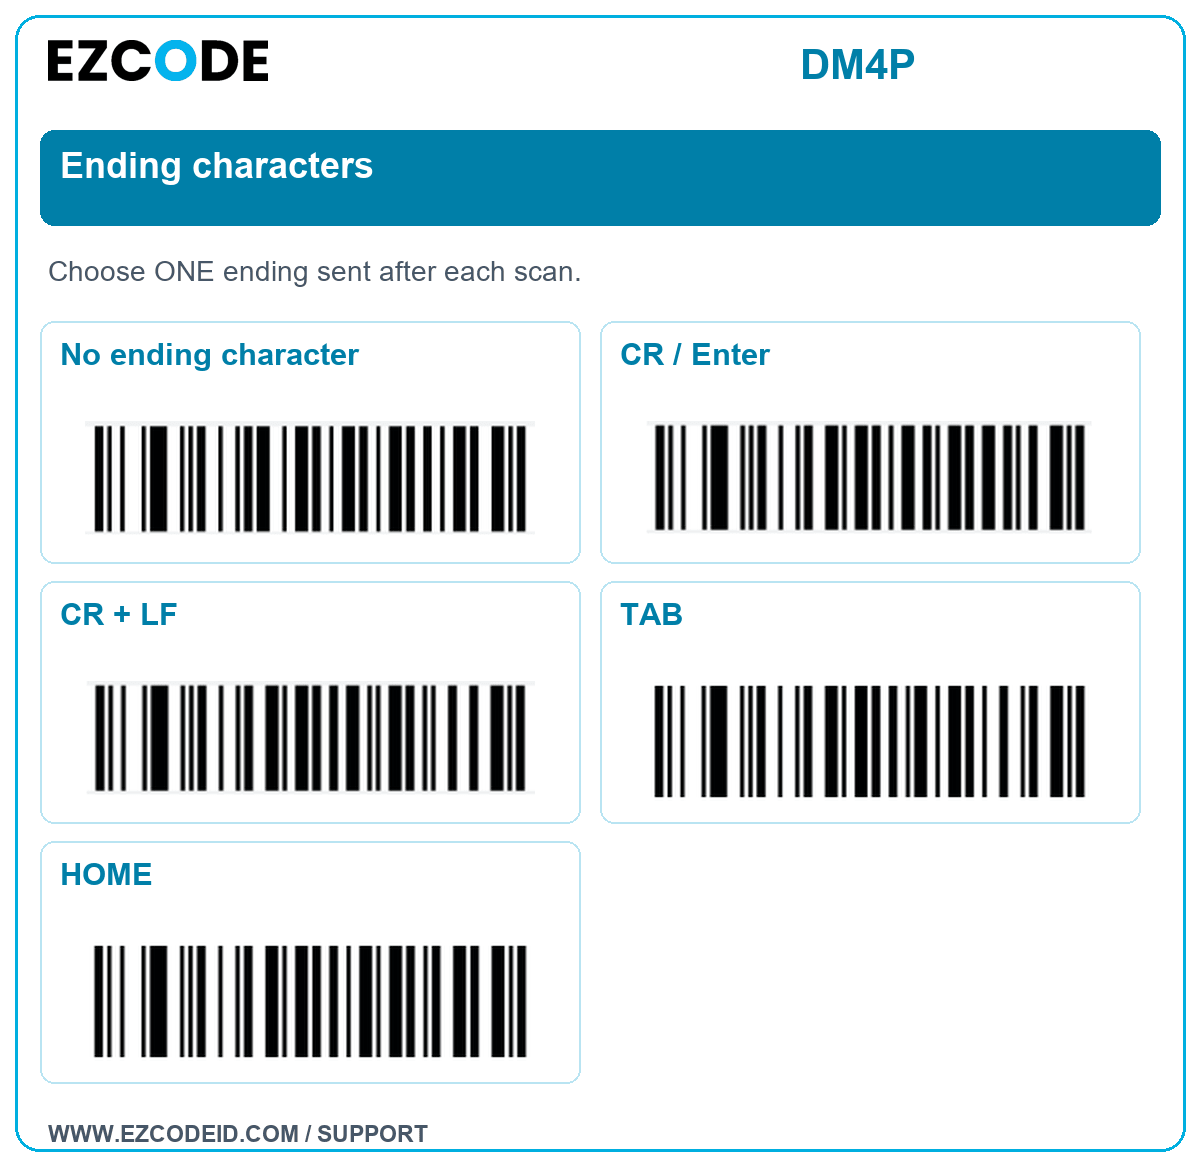
Ending characters
Choose ONE ending sent after each scan.
Open / save ending characters image ↗No ending character
CR / Enter
CR + LF
TAB
HOME
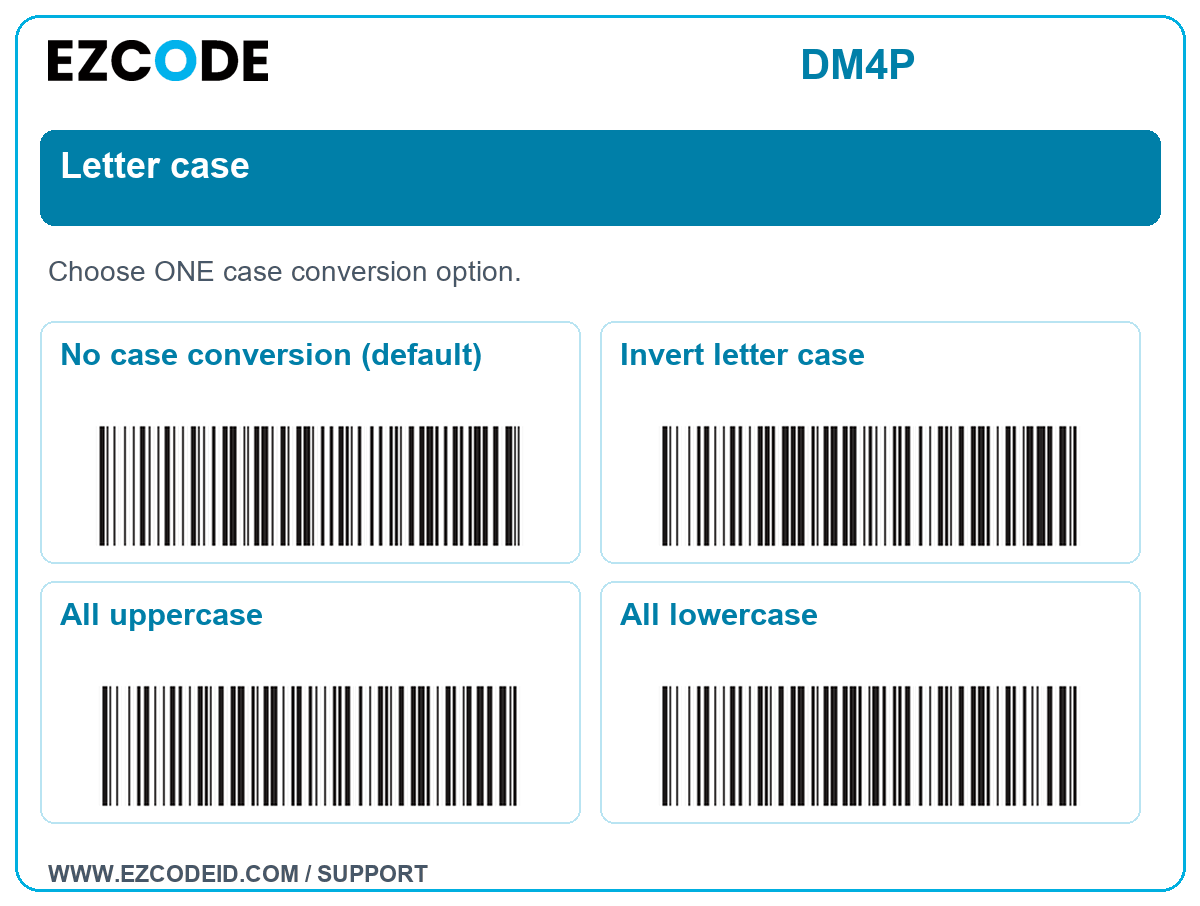
Letter case
Choose ONE case conversion option.
Open / save letter case image ↗No case conversion (default)
Invert letter case
All uppercase
All lowercase
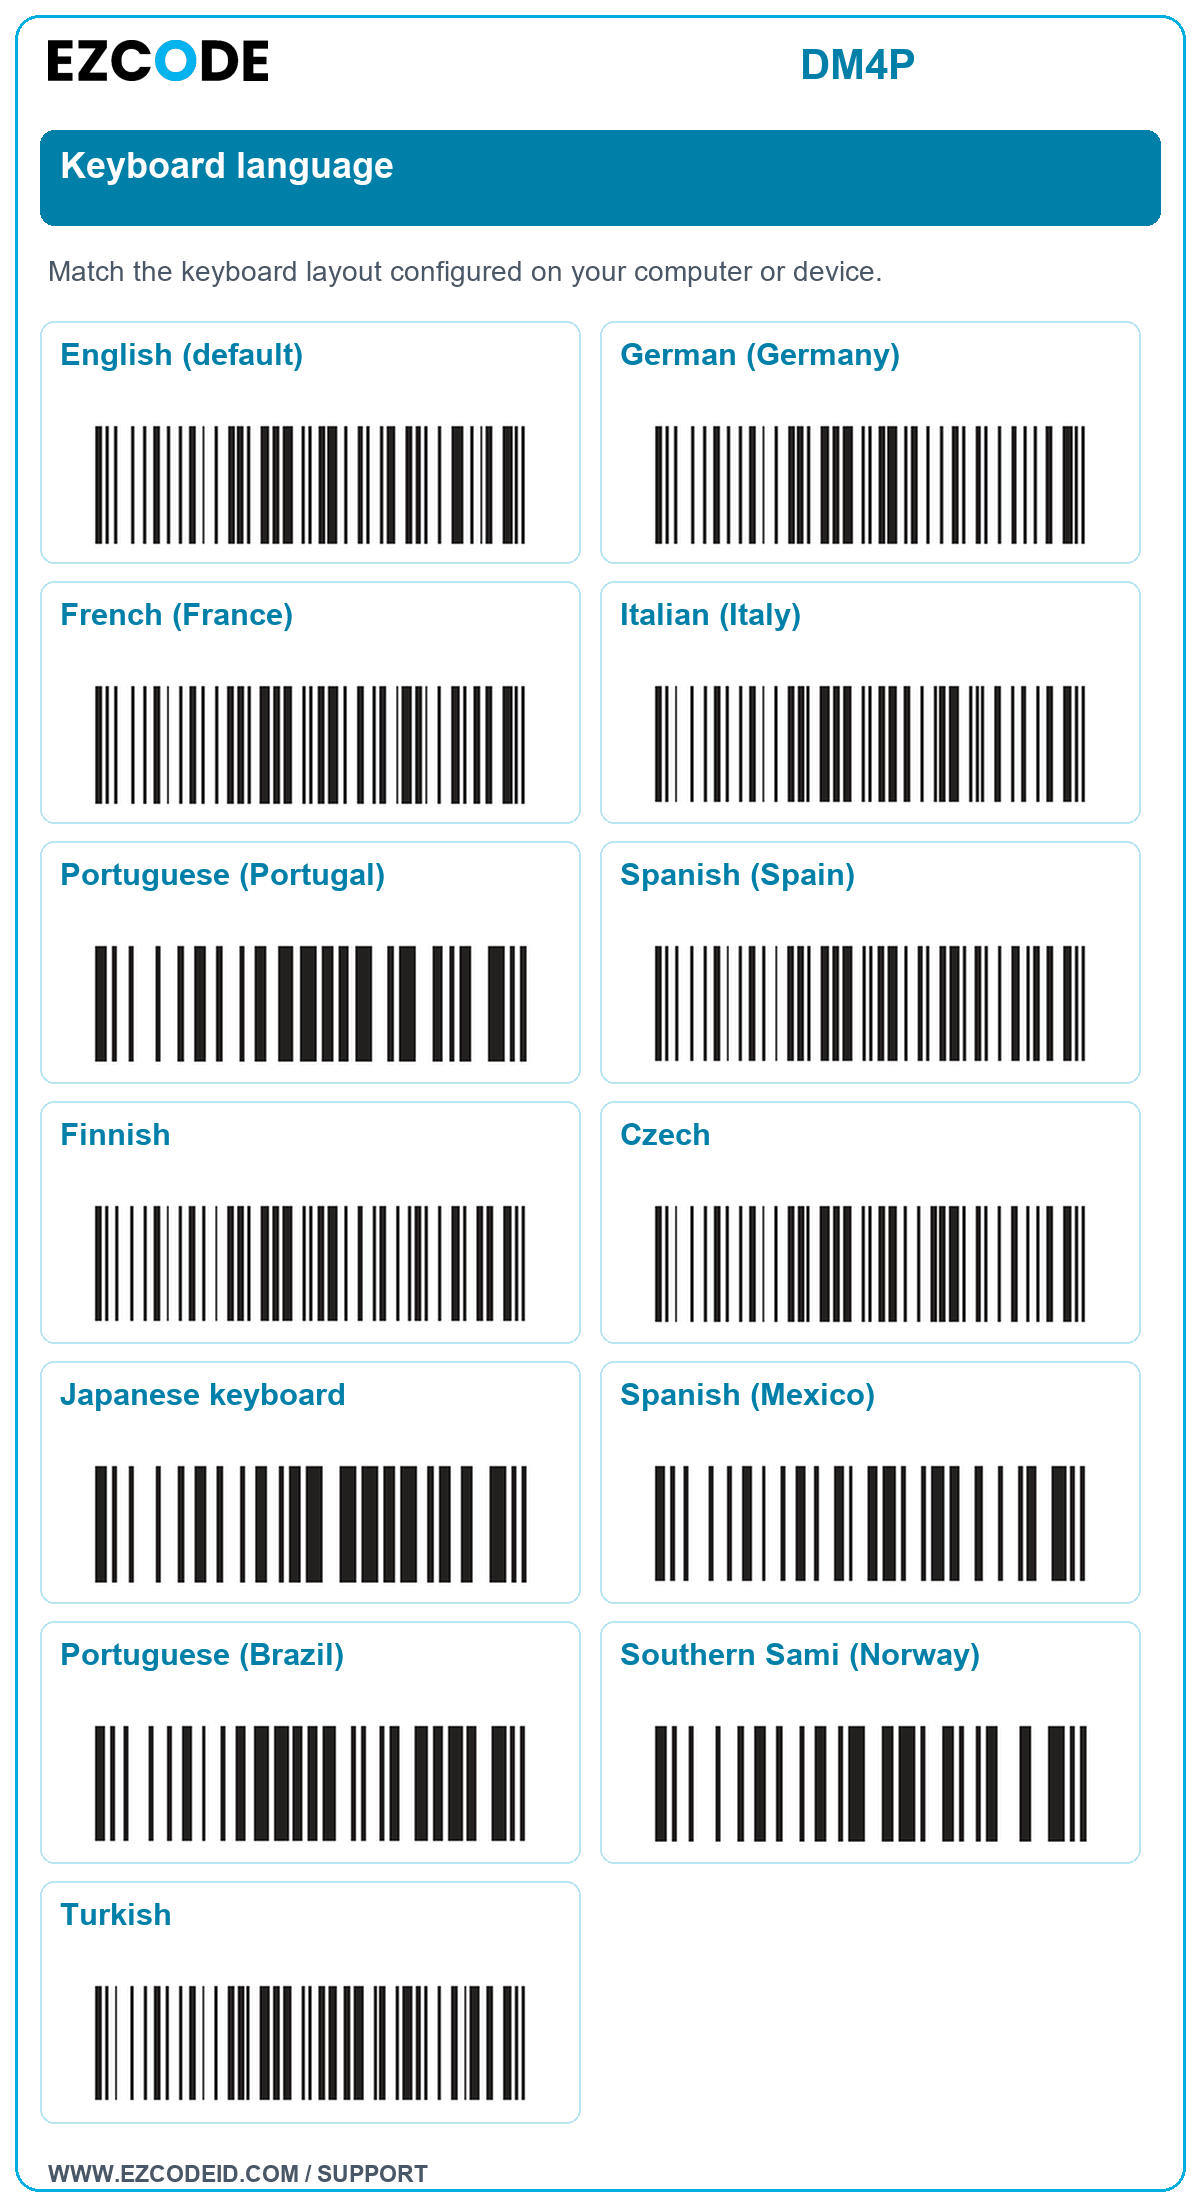
Keyboard language
Match the keyboard layout configured on your computer or device.
Open / save keyboard language image ↗English (default)
German (Germany)
French (France)
Italian (Italy)
Portuguese (Portugal)
Spanish (Spain)
Finnish
Czech
Japanese keyboard
Spanish (Mexico)
Portuguese (Brazil)
Southern Sami (Norway)
Turkish
← Back to SupportAdvanced settings & reference
These settings change the data sent to your application. Change only what you need, and follow the sequence for parameter-based operations.
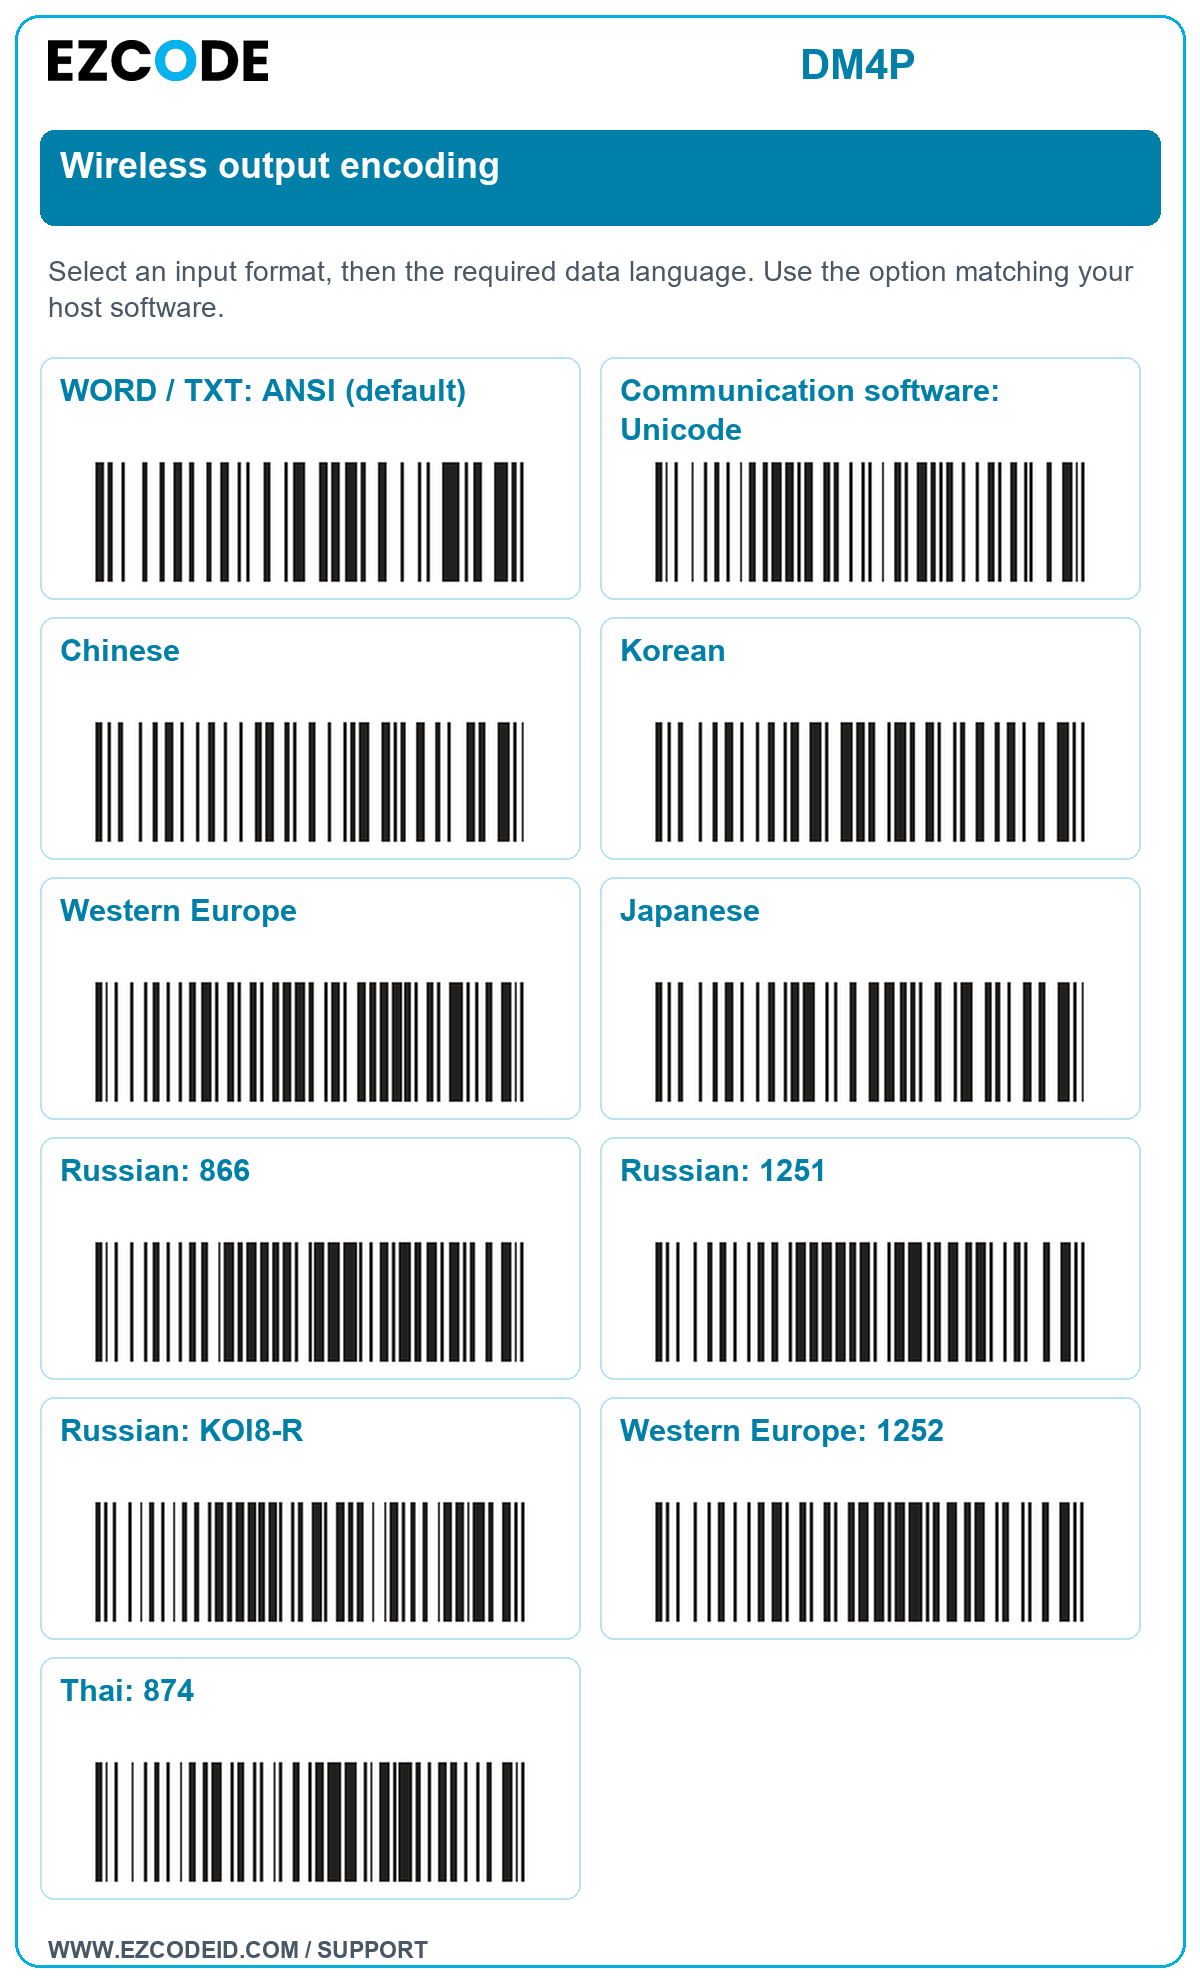
Wireless output encoding
Select an input format, then the required data language. Use the option matching your host software.
Open / save wireless output encoding image ↗WORD / TXT: ANSI (default)
Communication software: Unicode
Chinese
Korean
Western Europe
Japanese
Russian: 866
Russian: 1251
Russian: KOI8-R
Western Europe: 1252
Thai: 874
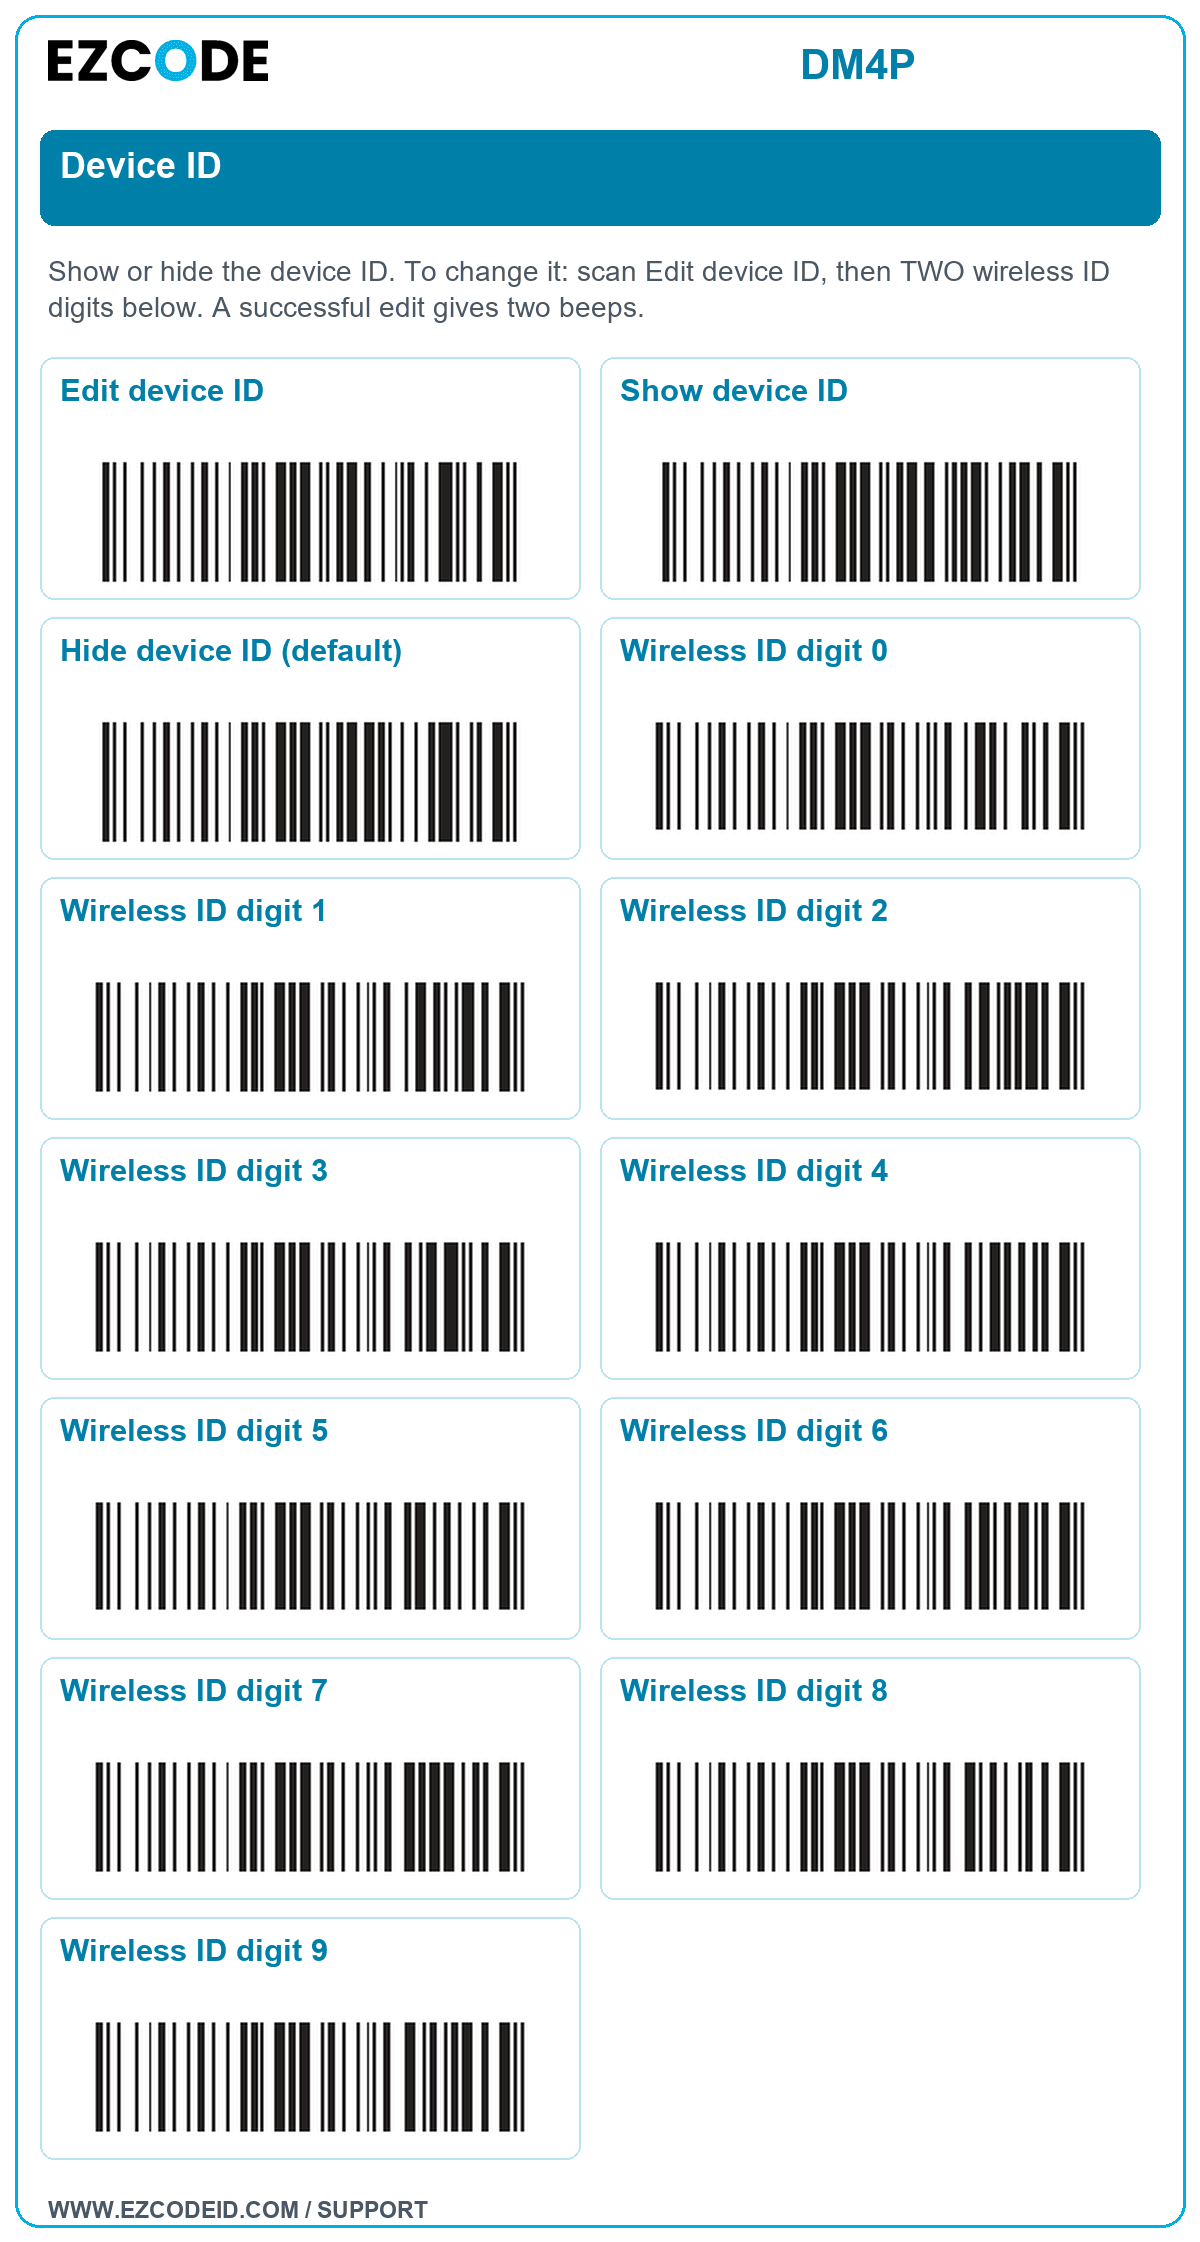
Device ID
Show or hide the device ID. To change it: scan Edit device ID, then TWO wireless ID digits below. A successful edit gives two beeps.
Open / save device id image ↗Edit device ID
Show device ID
Hide device ID (default)
Wireless ID digit 0
Wireless ID digit 1
Wireless ID digit 2
Wireless ID digit 3
Wireless ID digit 4
Wireless ID digit 5
Wireless ID digit 6
Wireless ID digit 7
Wireless ID digit 8
Wireless ID digit 9
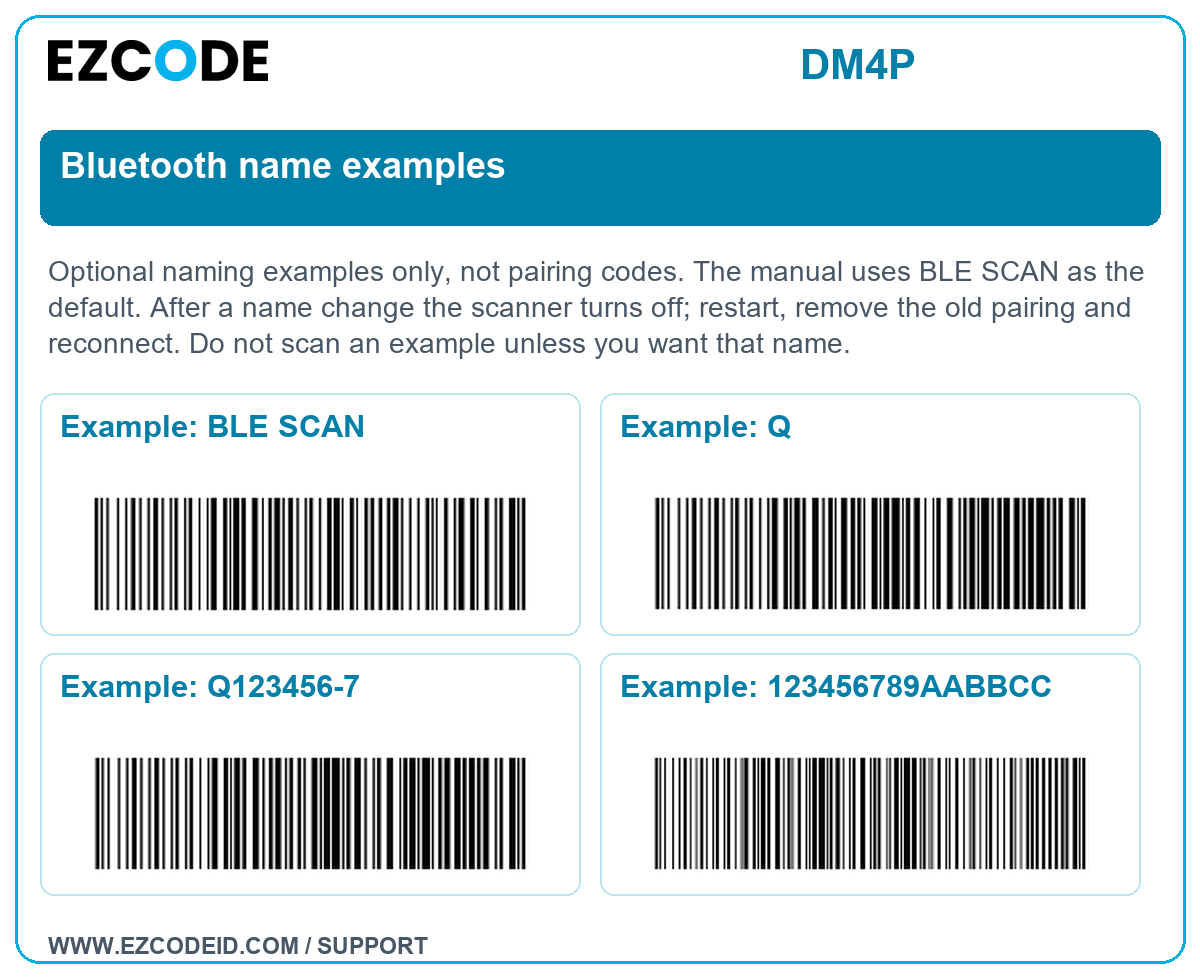
Bluetooth name examples
Optional naming examples only, not pairing codes. The manual uses BLE SCAN as the default. After a name change the scanner turns off; restart, remove the old pairing and reconnect. Do not scan an example unless you want that name.
Open / save bluetooth name examples image ↗Example: BLE SCAN
Example: Q
Example: Q123456-7
Example: 123456789AABBCC
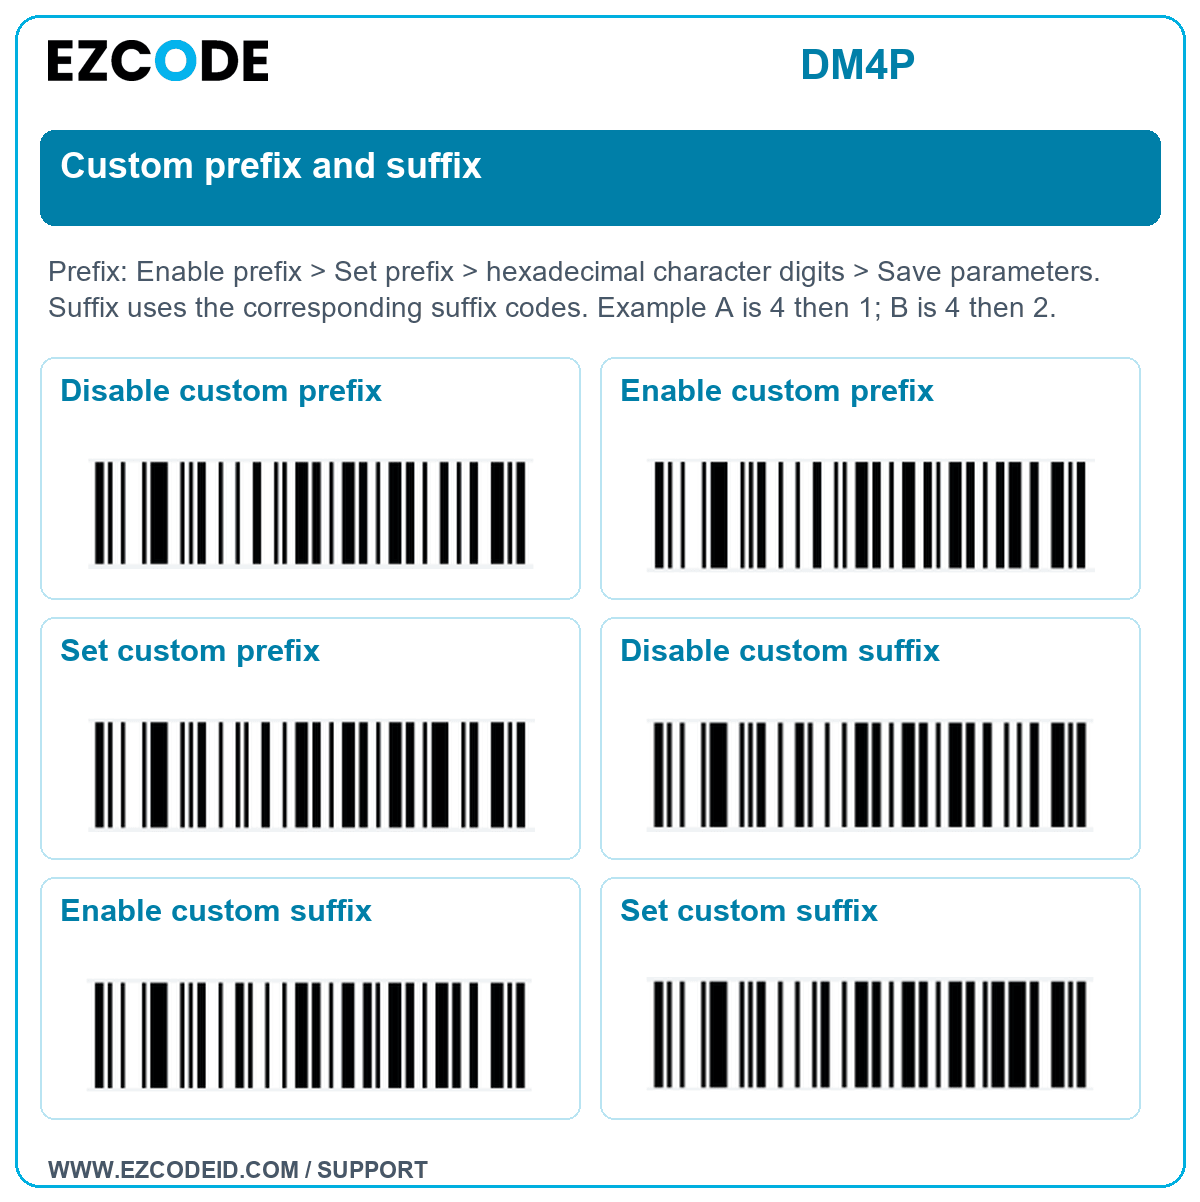
Custom prefix and suffix
Prefix: Enable prefix > Set prefix > hexadecimal character digits > Save parameters. Suffix uses the corresponding suffix codes. Example A is 4 then 1; B is 4 then 2.
Open / save custom prefix and suffix image ↗Disable custom prefix
Enable custom prefix
Set custom prefix
Disable custom suffix
Enable custom suffix
Set custom suffix
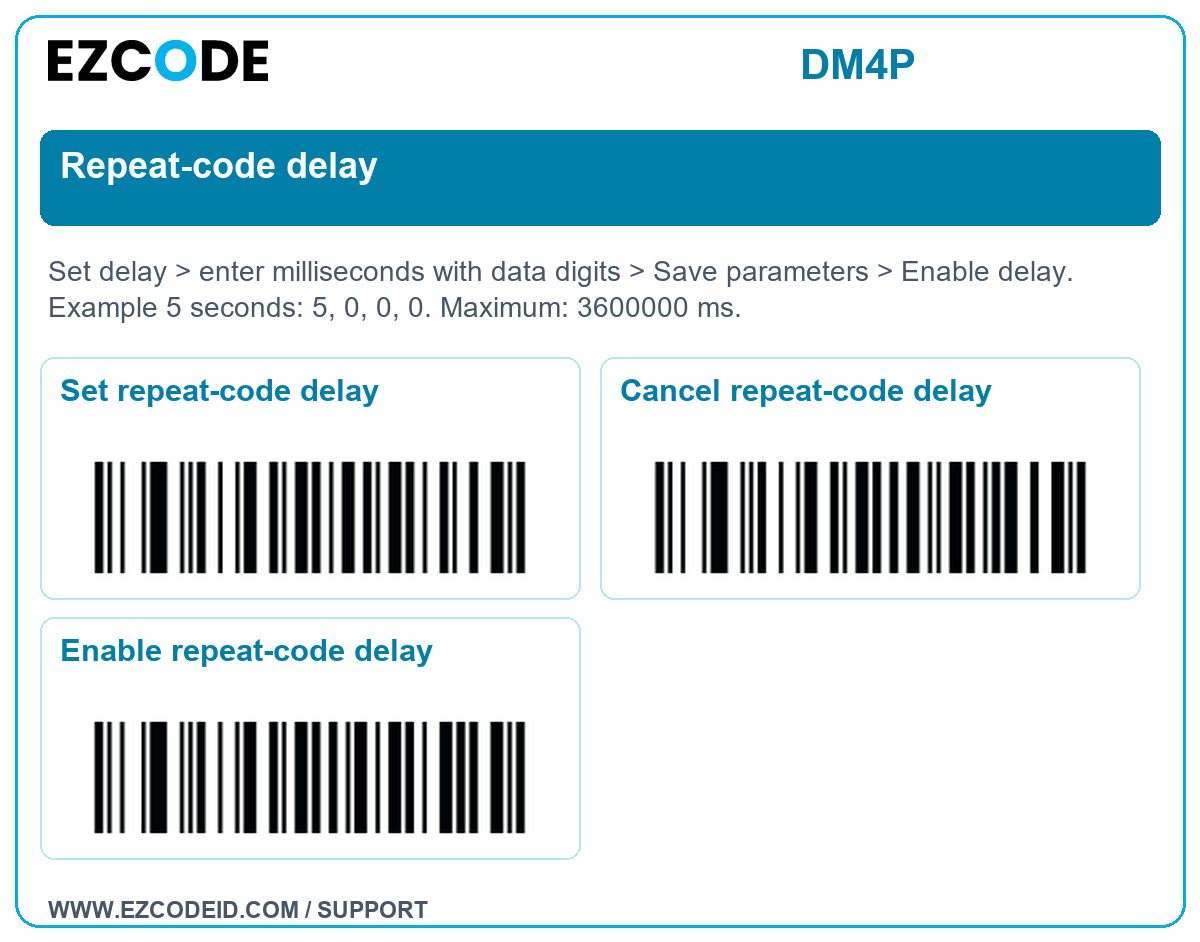
Repeat-code delay
Set delay > enter milliseconds with data digits > Save parameters > Enable delay. Example 5 seconds: 5, 0, 0, 0. Maximum: 3600000 ms.
Open / save repeat-code delay image ↗Set repeat-code delay
Cancel repeat-code delay
Enable repeat-code delay
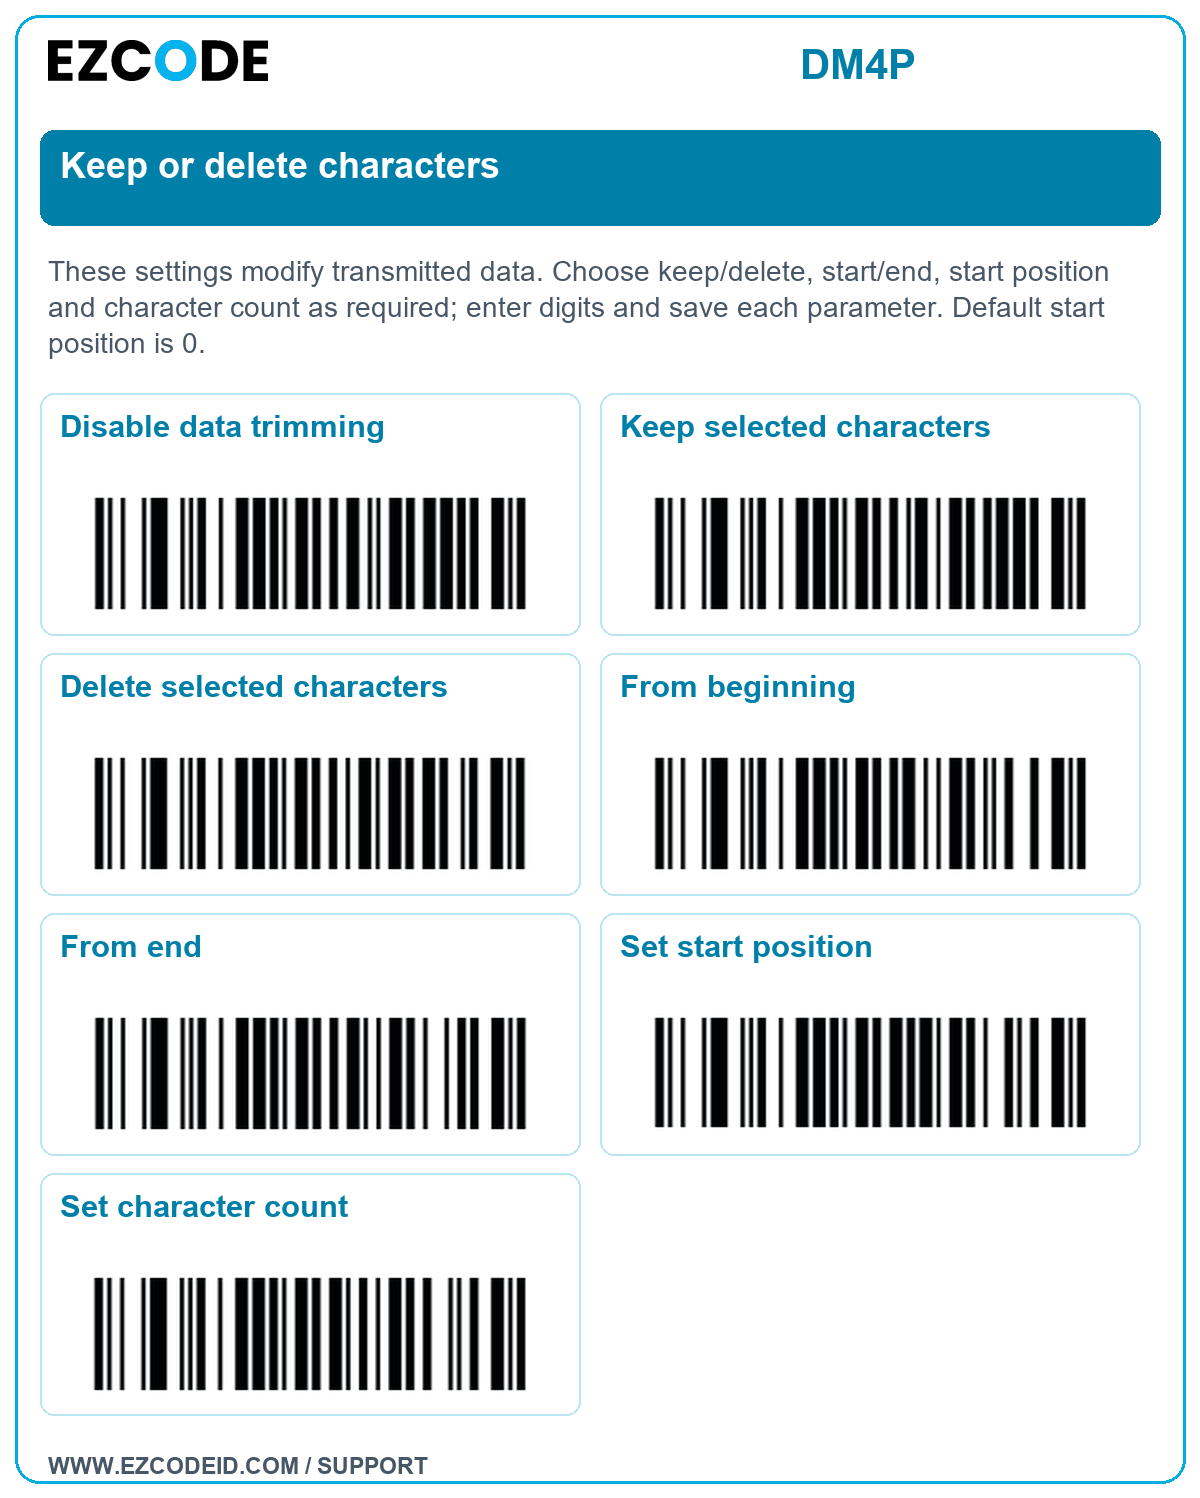
Keep or delete characters
These settings modify transmitted data. Choose keep/delete, start/end, start position and character count as required; enter digits and save each parameter. Default start position is 0.
Open / save keep or delete characters image ↗Disable data trimming
Keep selected characters
Delete selected characters
From beginning
From end
Set start position
Set character count
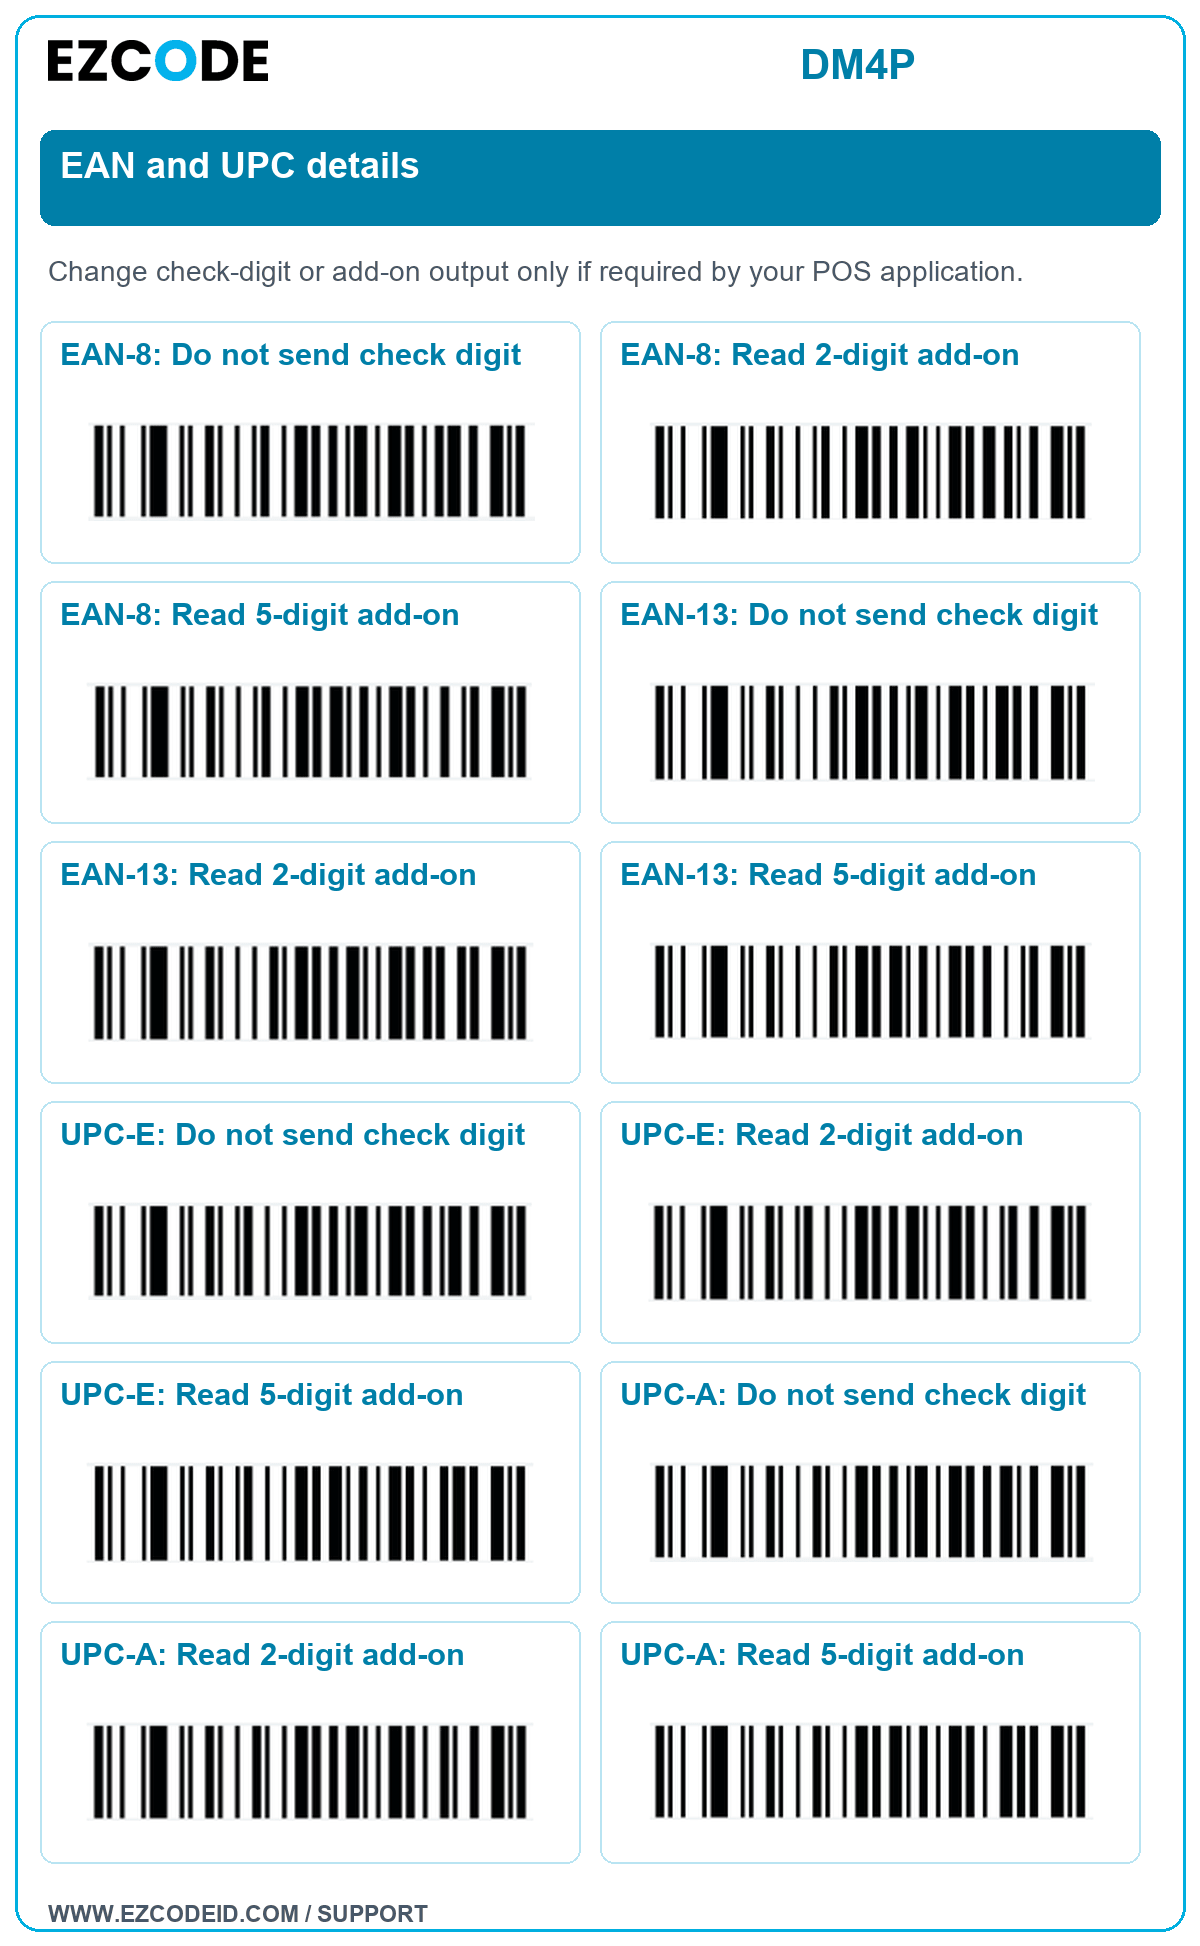
EAN and UPC details
Change check-digit or add-on output only if required by your POS application.
Open / save ean and upc details image ↗EAN-8: Do not send check digit
EAN-8: Read 2-digit add-on
EAN-8: Read 5-digit add-on
EAN-13: Do not send check digit
EAN-13: Read 2-digit add-on
EAN-13: Read 5-digit add-on
UPC-E: Do not send check digit
UPC-E: Read 2-digit add-on
UPC-E: Read 5-digit add-on
UPC-A: Do not send check digit
UPC-A: Read 2-digit add-on
UPC-A: Read 5-digit add-on
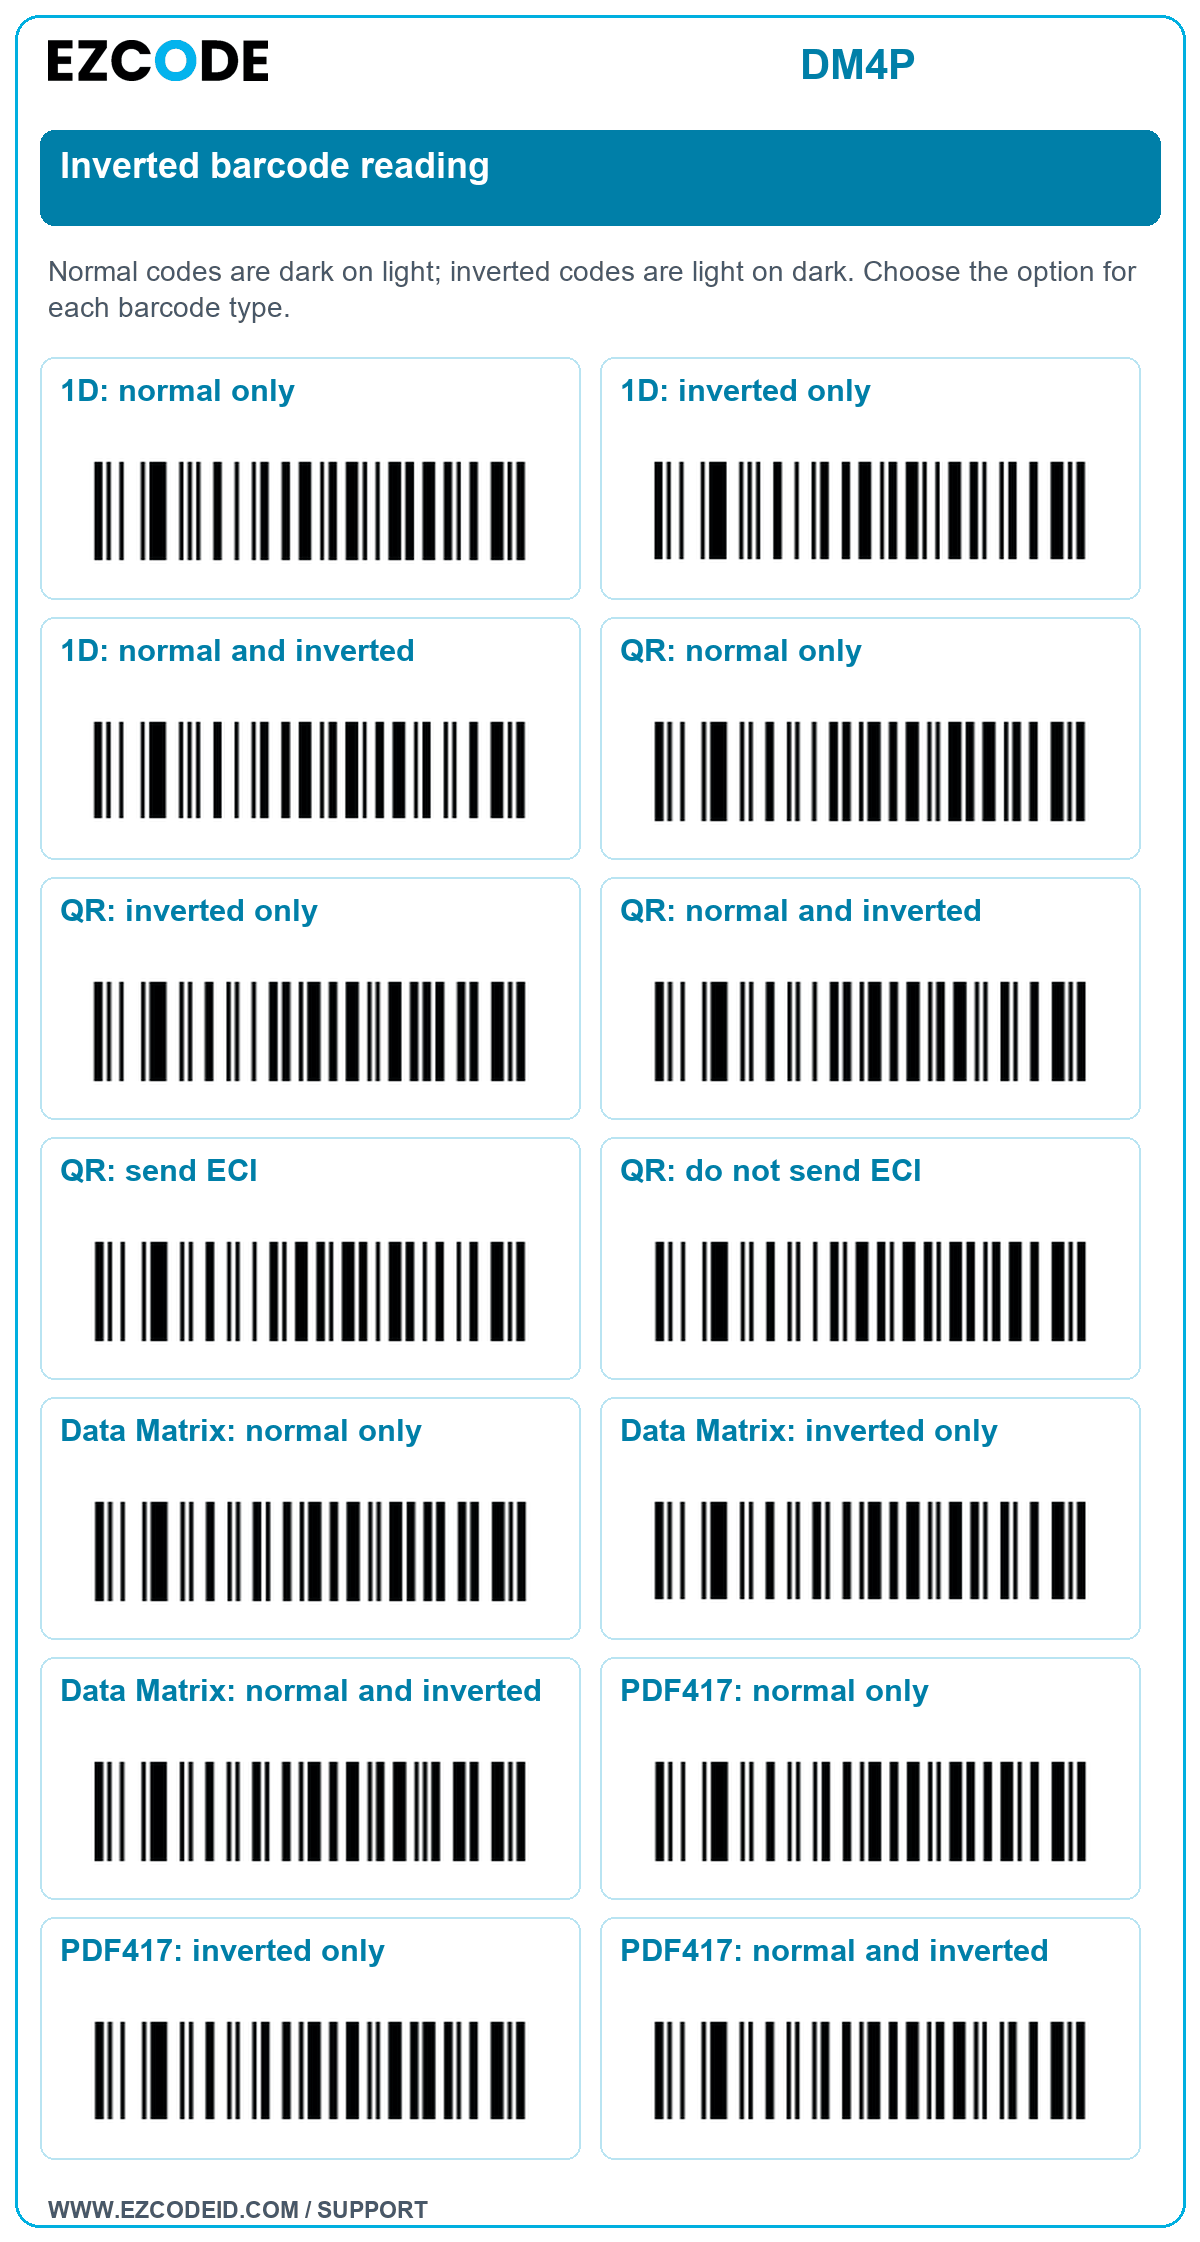
Inverted barcode reading
Normal codes are dark on light; inverted codes are light on dark. Choose the option for each barcode type.
Open / save inverted barcode reading image ↗1D: normal only
1D: inverted only
1D: normal and inverted
QR: normal only
QR: inverted only
QR: normal and inverted
QR: send ECI
QR: do not send ECI
Data Matrix: normal only
Data Matrix: inverted only
Data Matrix: normal and inverted
PDF417: normal only
PDF417: inverted only
PDF417: normal and inverted
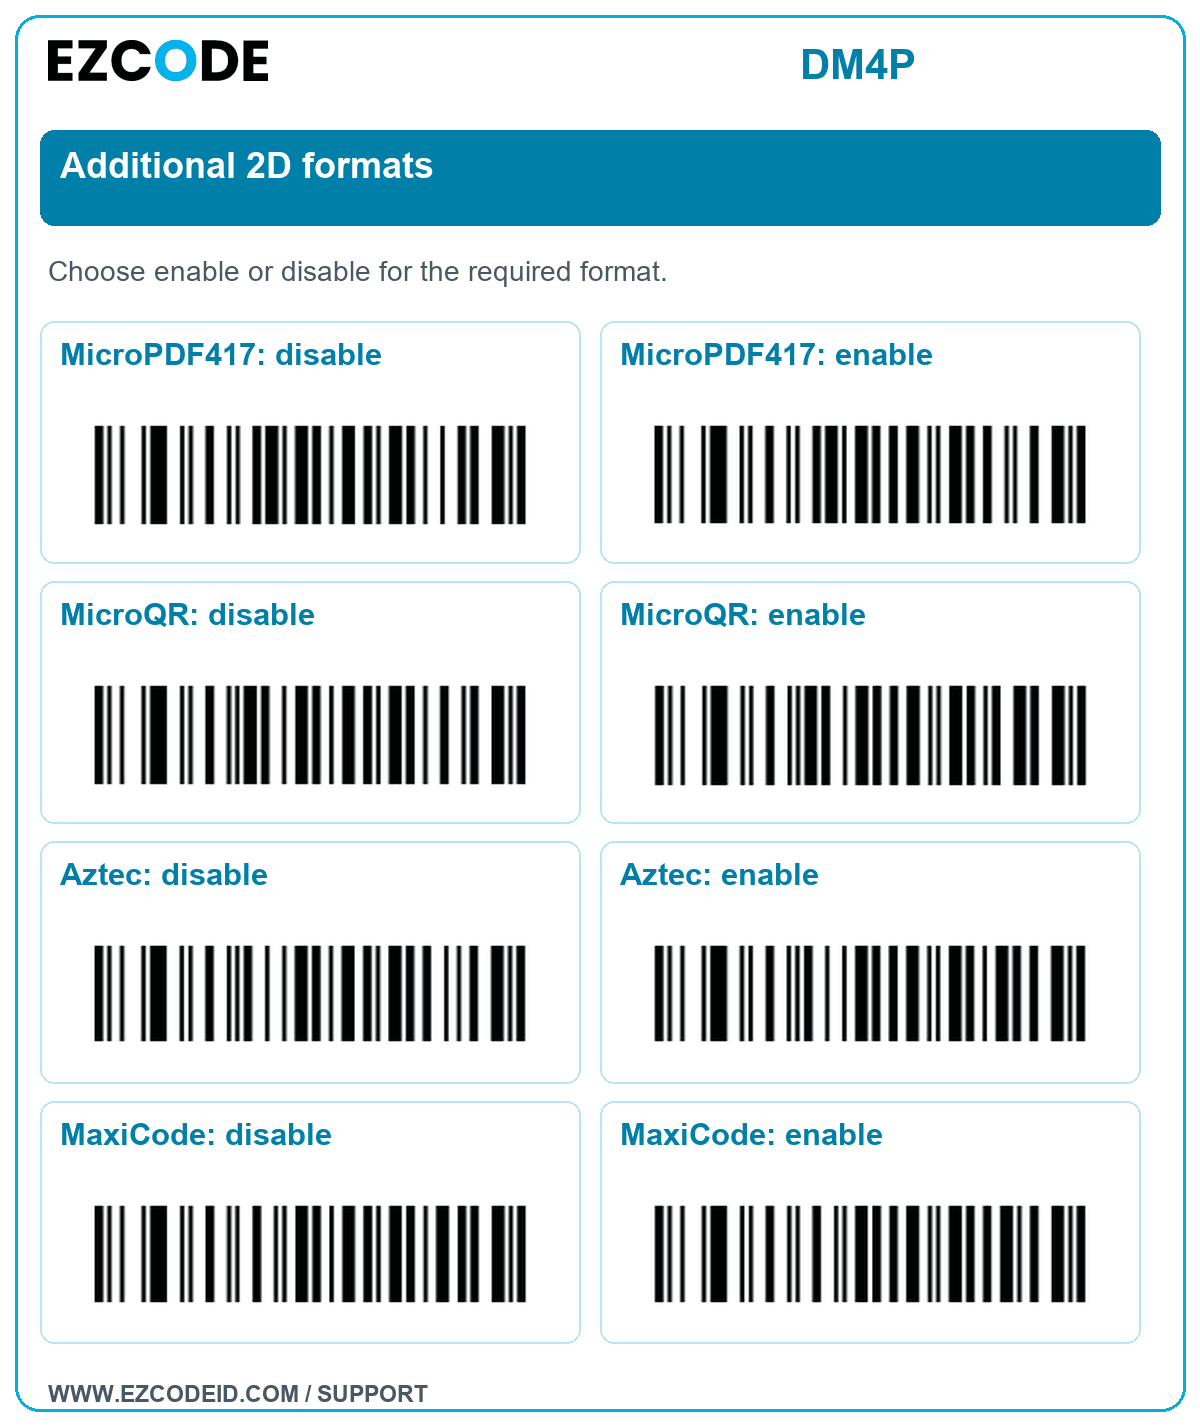
Additional 2D formats
Choose enable or disable for the required format.
Open / save additional 2d formats image ↗MicroPDF417: disable
MicroPDF417: enable
MicroQR: disable
MicroQR: enable
Aztec: disable
Aztec: enable
MaxiCode: disable
MaxiCode: enable
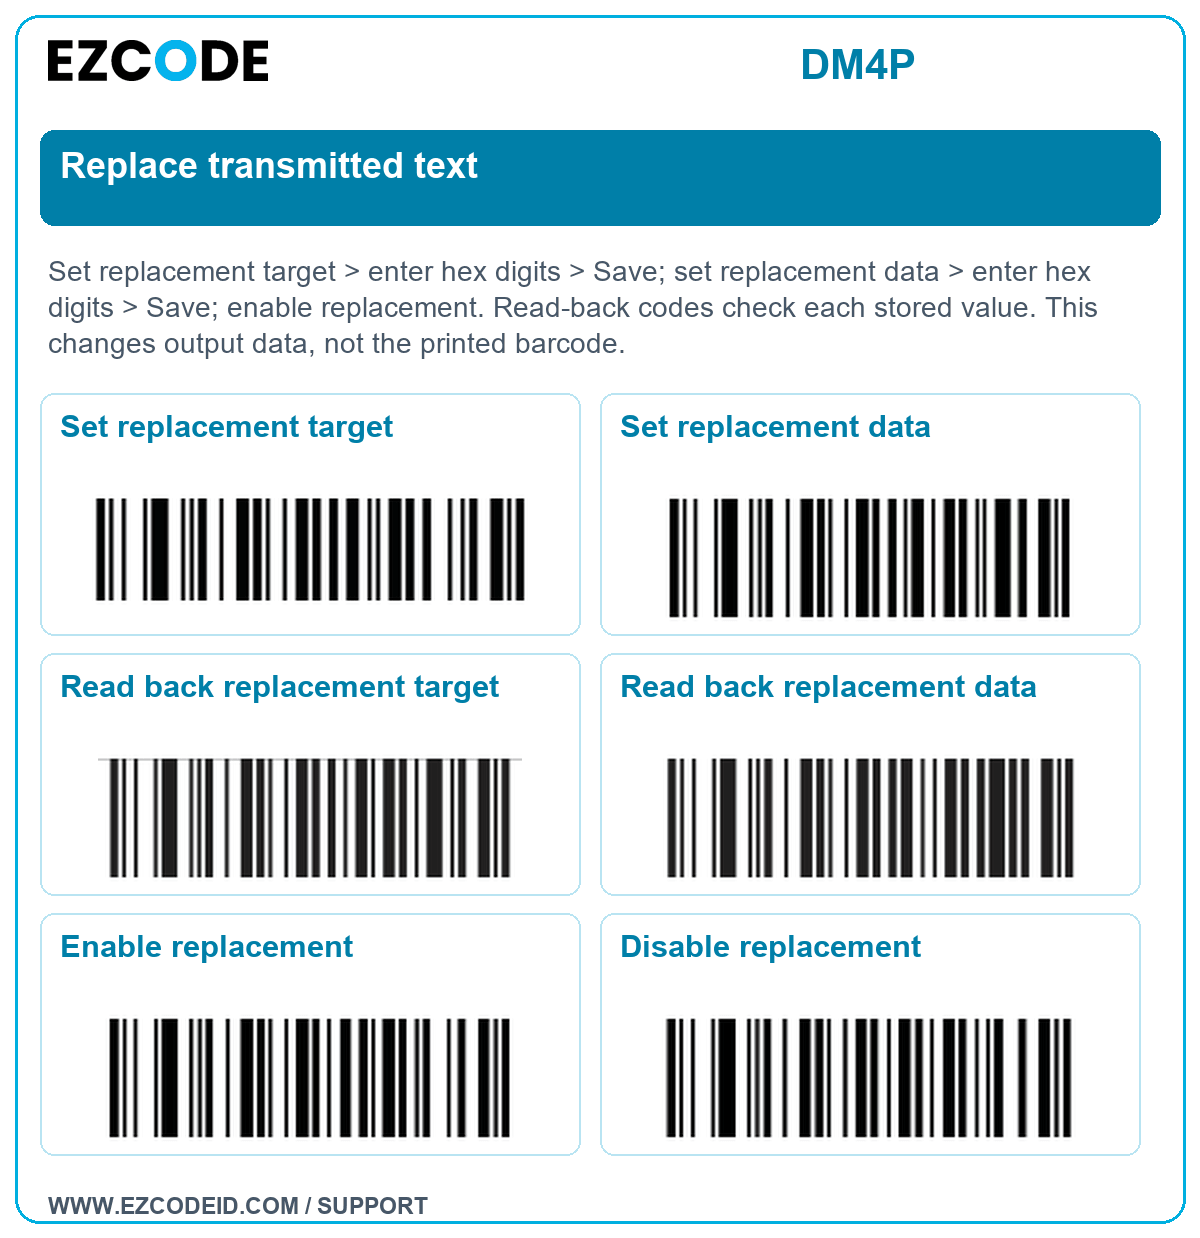
Replace transmitted text
Set replacement target > enter hex digits > Save; set replacement data > enter hex digits > Save; enable replacement. Read-back codes check each stored value. This changes output data, not the printed barcode.
Open / save replace transmitted text image ↗Set replacement target
Set replacement data
Read back replacement target
Read back replacement data
Enable replacement
Disable replacement
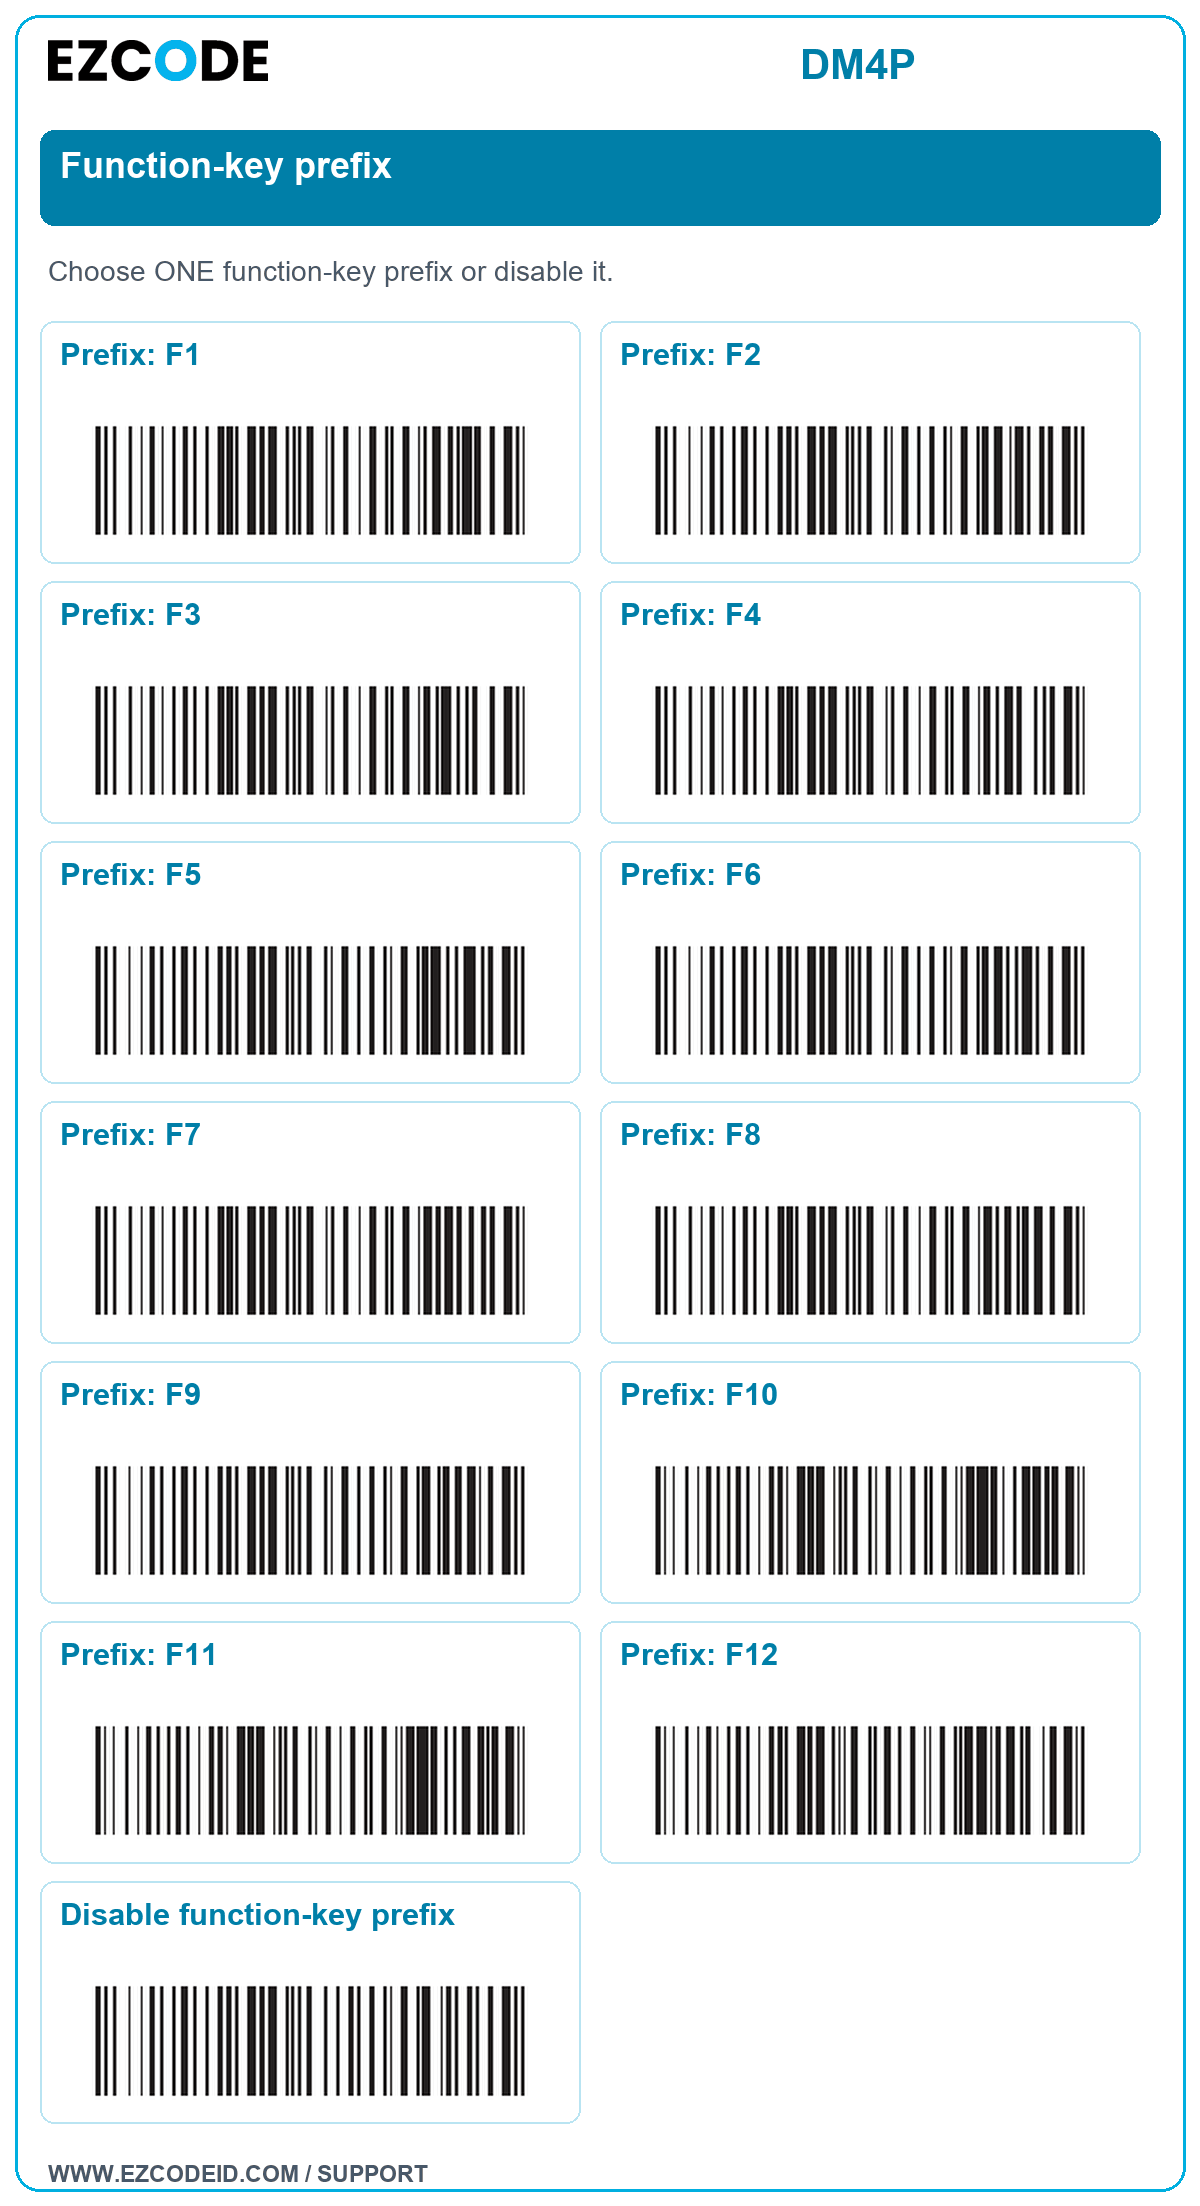
Function-key prefix
Choose ONE function-key prefix or disable it.
Open / save function-key prefix image ↗Prefix: F1
Prefix: F2
Prefix: F3
Prefix: F4
Prefix: F5
Prefix: F6
Prefix: F7
Prefix: F8
Prefix: F9
Prefix: F10
Prefix: F11
Prefix: F12
Disable function-key prefix
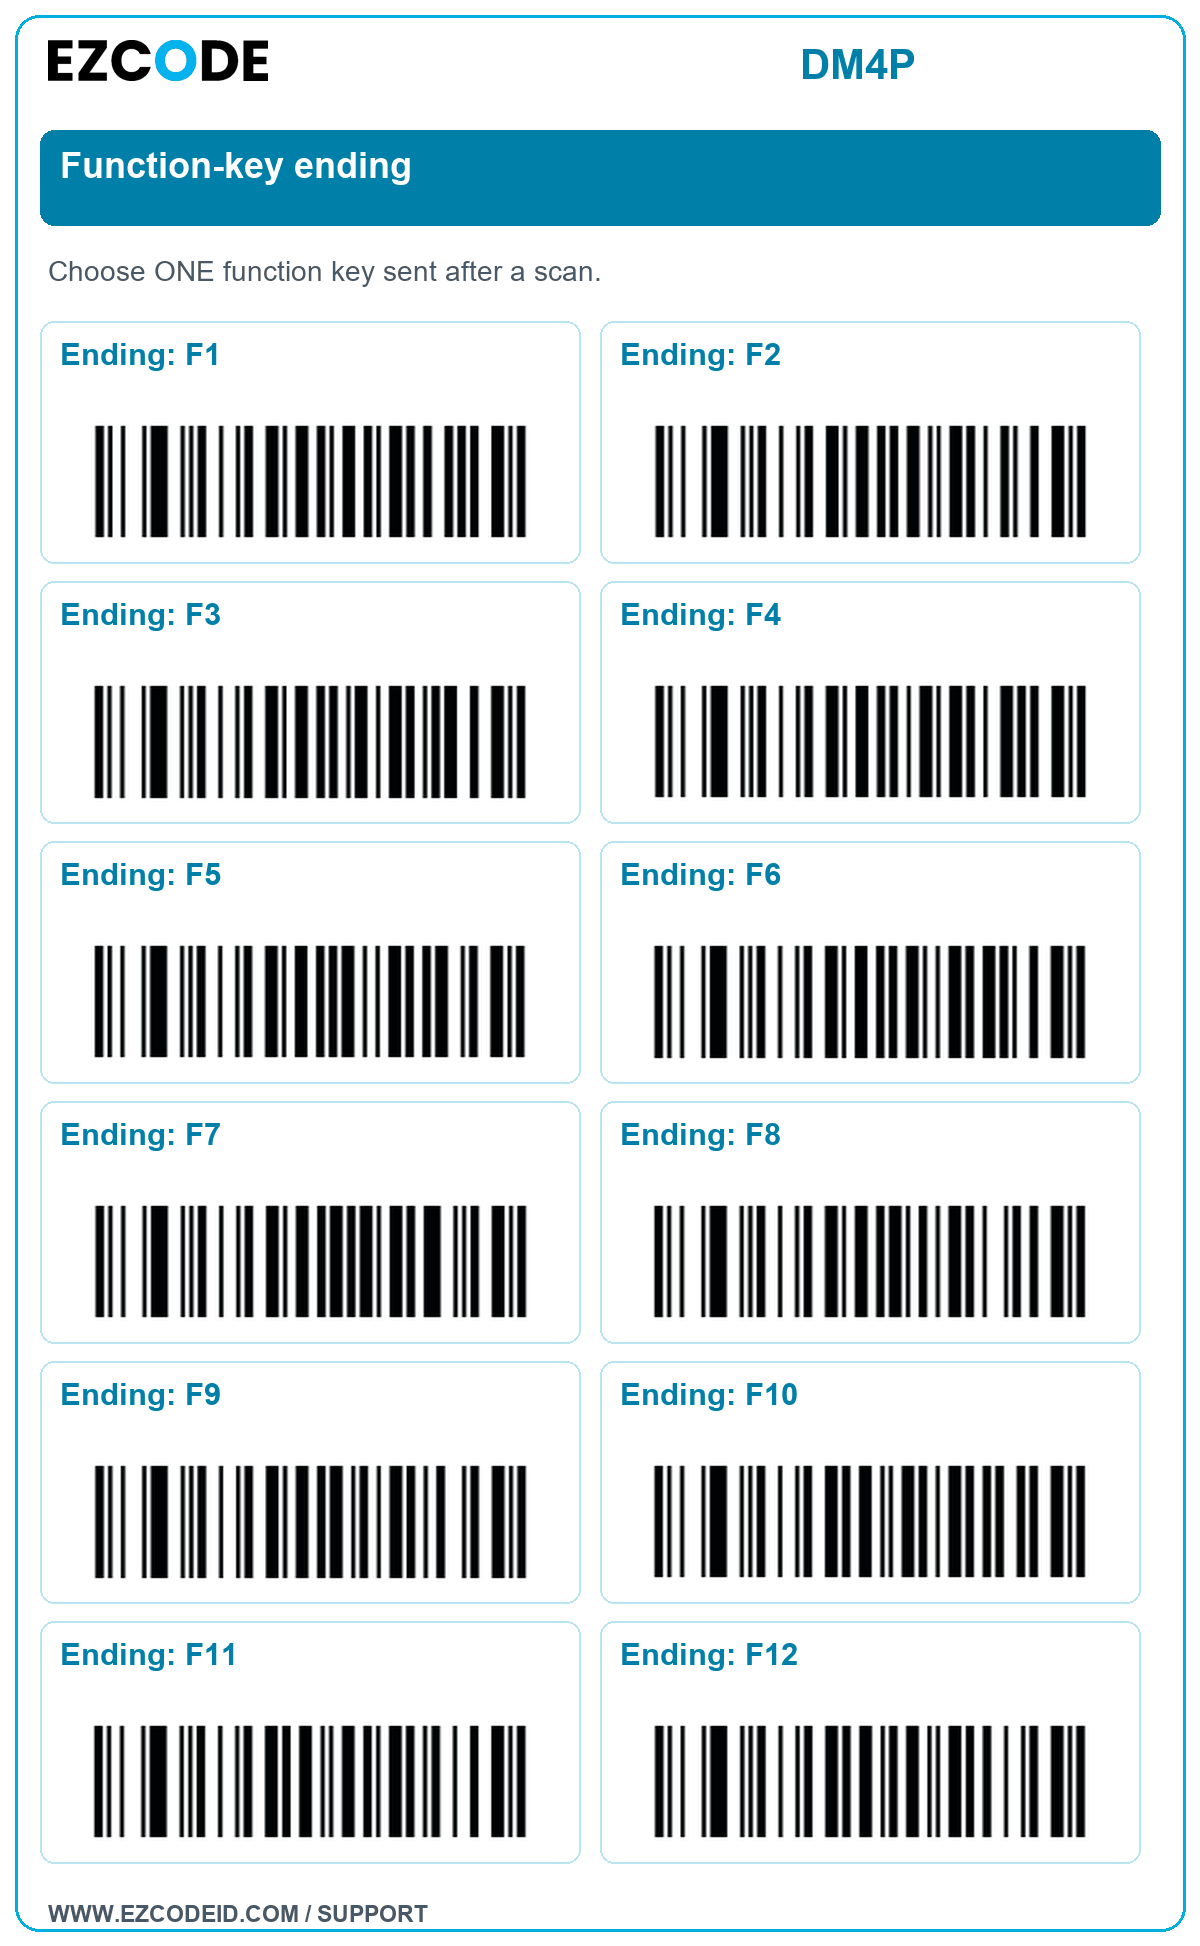
Function-key ending
Choose ONE function key sent after a scan.
Open / save function-key ending image ↗Ending: F1
Ending: F2
Ending: F3
Ending: F4
Ending: F5
Ending: F6
Ending: F7
Ending: F8
Ending: F9
Ending: F10
Ending: F11
Ending: F12
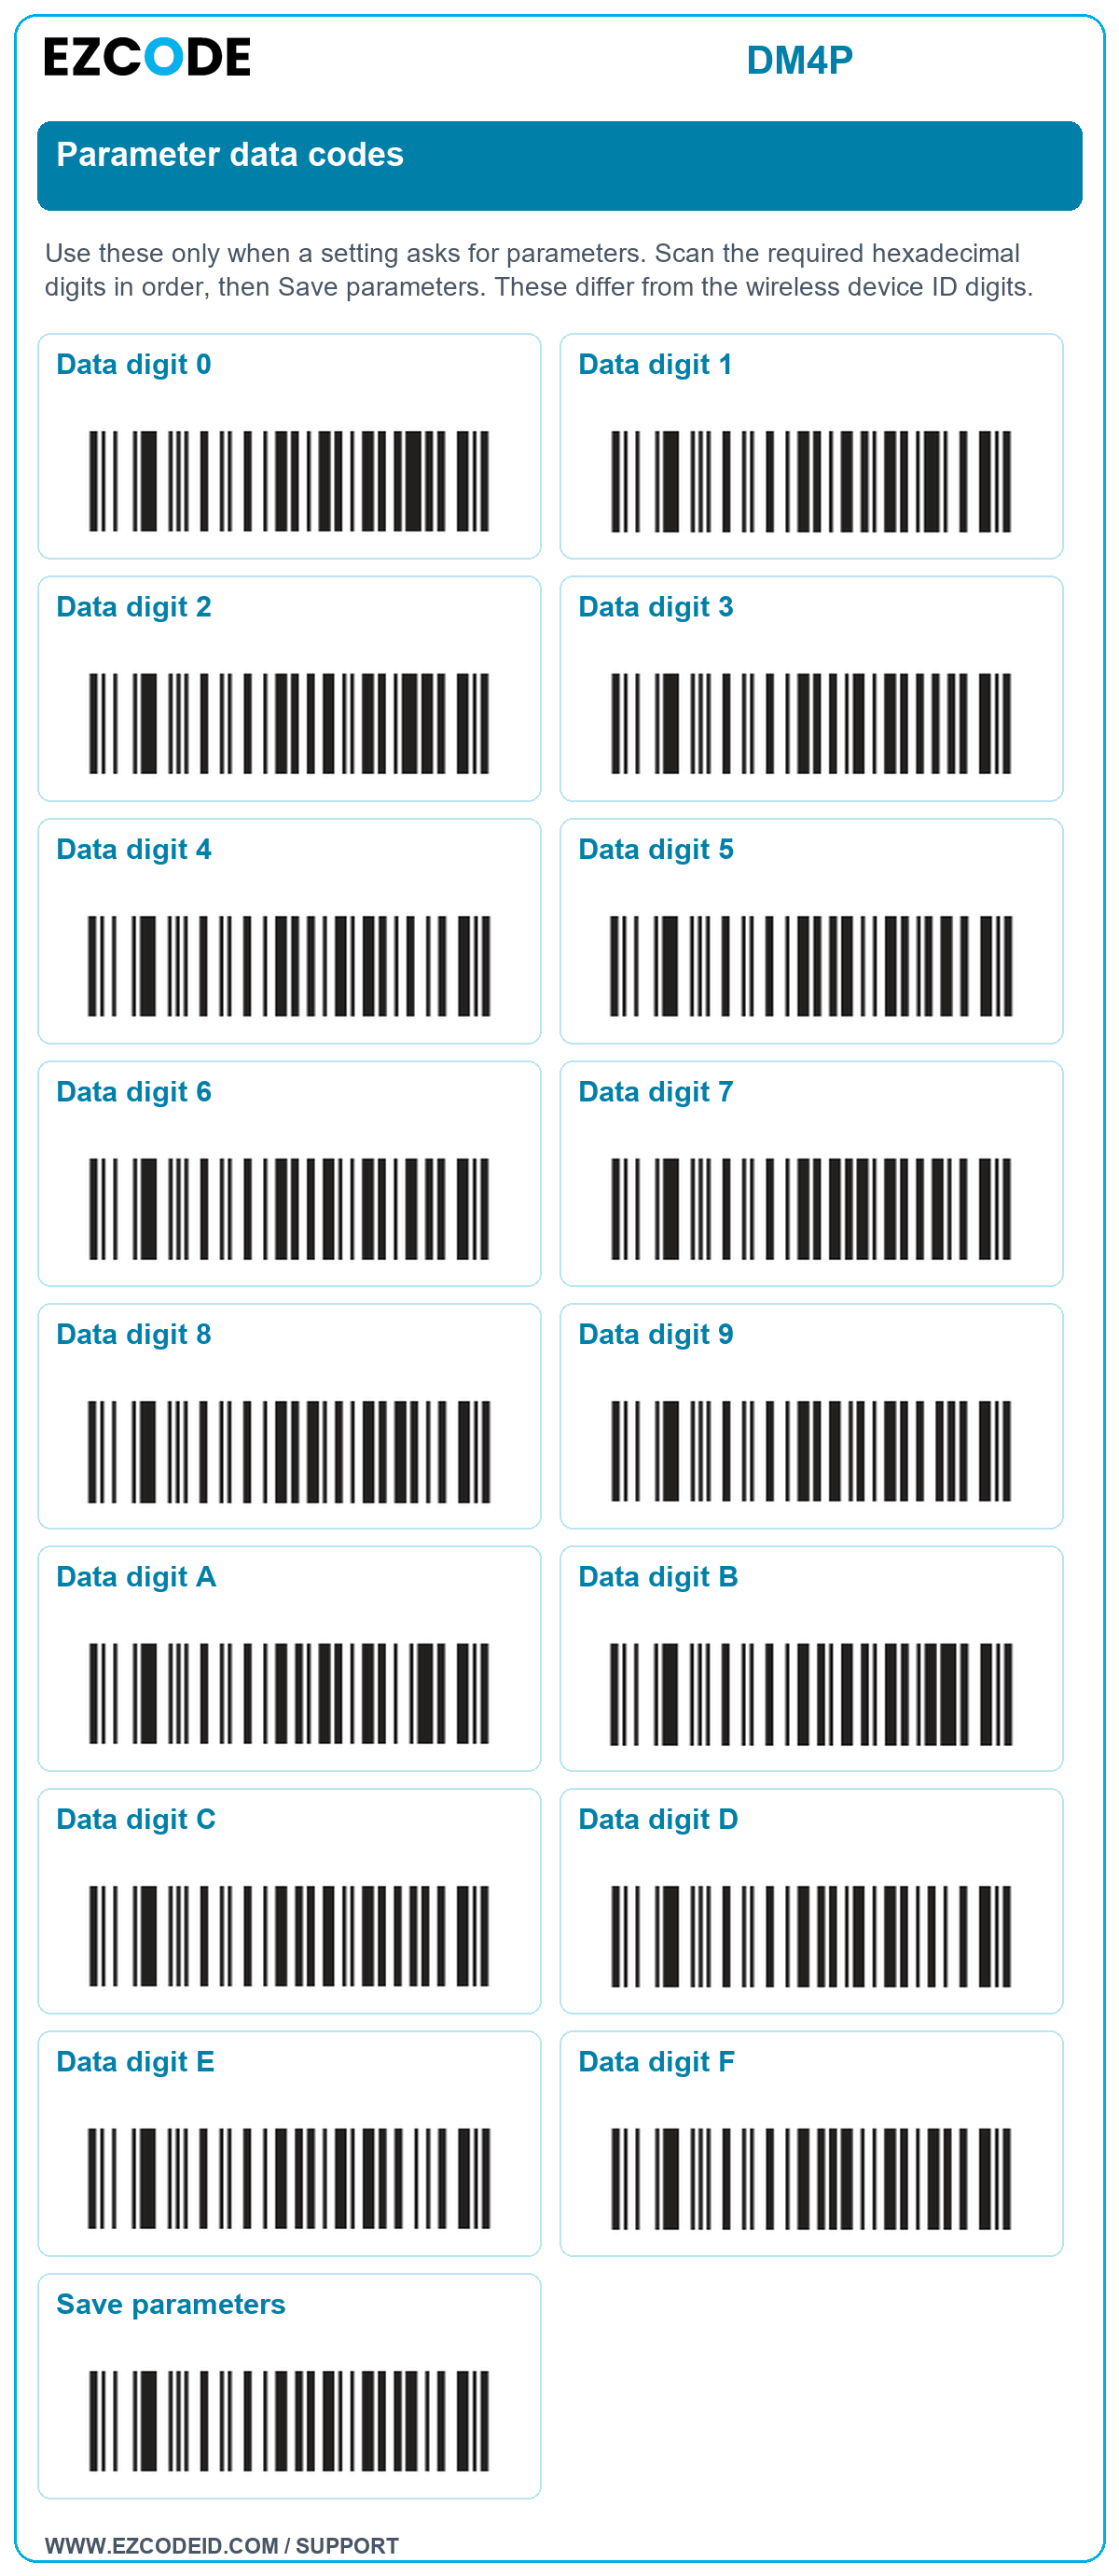
Parameter data codes
Use these only when a setting asks for parameters. Scan the required hexadecimal digits in order, then Save parameters. These differ from the wireless device ID digits.
Open / save parameter data codes image ↗Data digit 0
Data digit 1
Data digit 2
Data digit 3
Data digit 4
Data digit 5
Data digit 6
Data digit 7
Data digit 8
Data digit 9
Data digit A
Data digit B
Data digit C
Data digit D
Data digit E
Data digit F
Save parameters
Original manual reference
Original manufacturer instructions and examples. Example test barcodes are demonstrations, not configuration codes. Use the setting cards above for everyday setup.
Bluetooth naming instructions
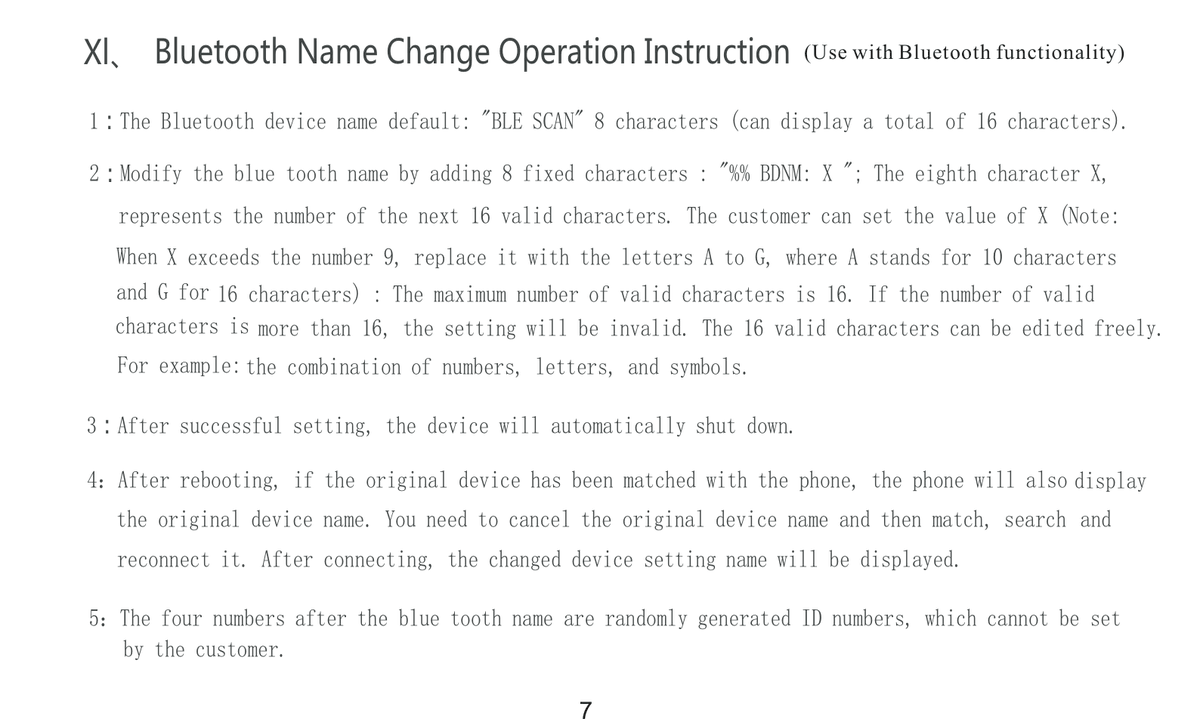 Open / save original page ↗
Data trimming instructions - part 1
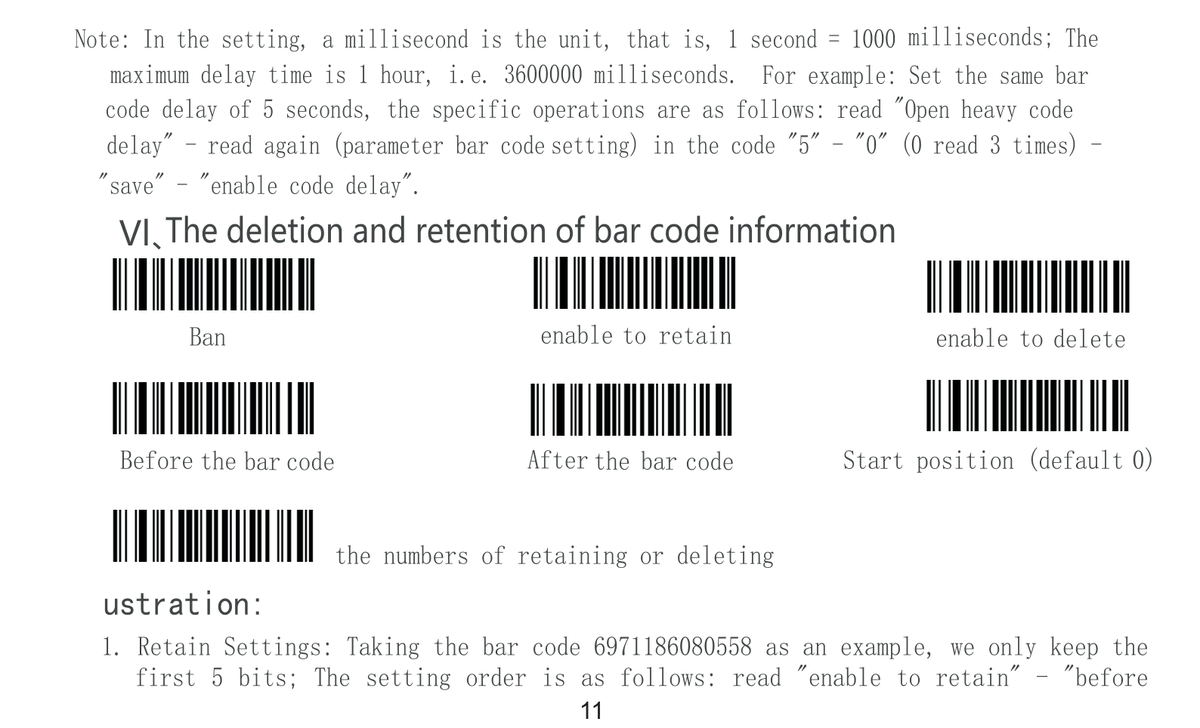 Open / save original page ↗
Data trimming instructions - part 2
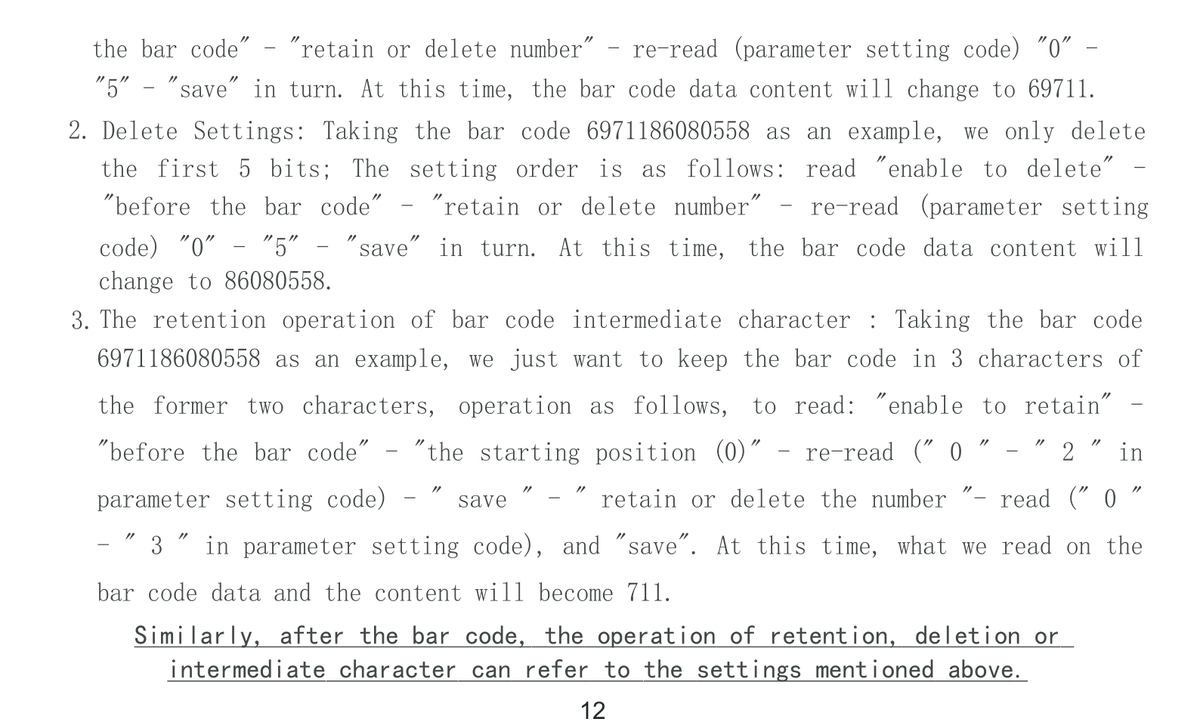 Open / save original page ↗
Text replacement instructions - part 1
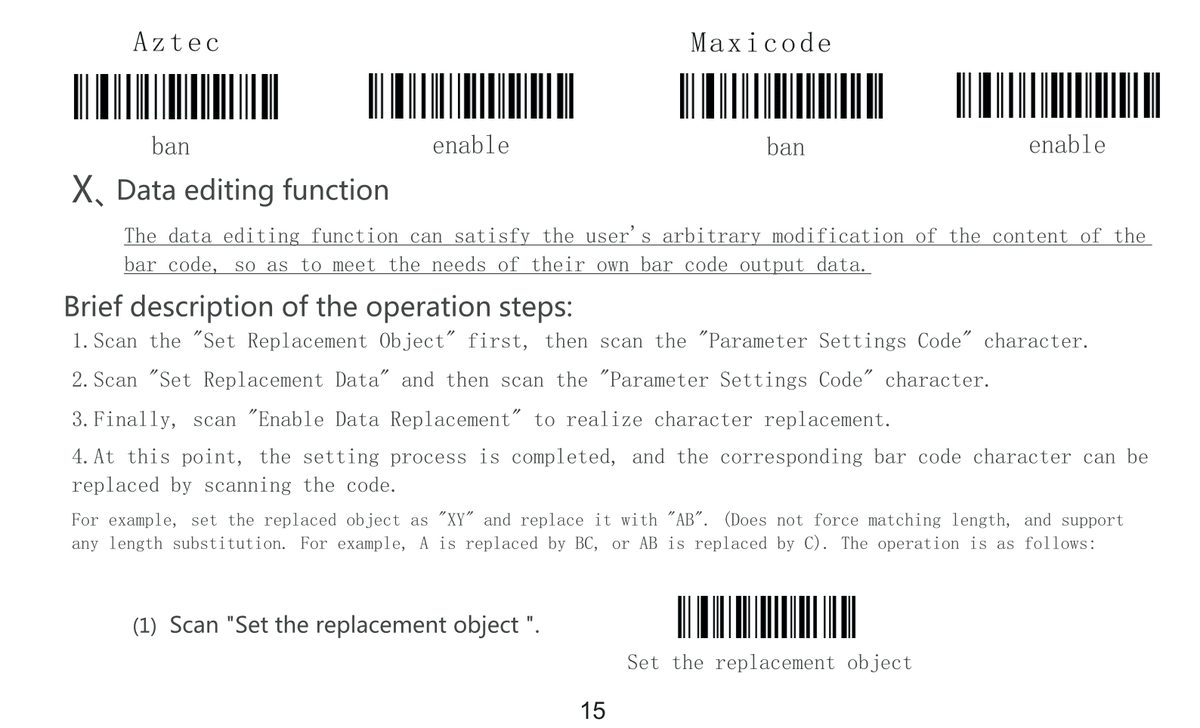 Open / save original page ↗
Text replacement instructions - part 2
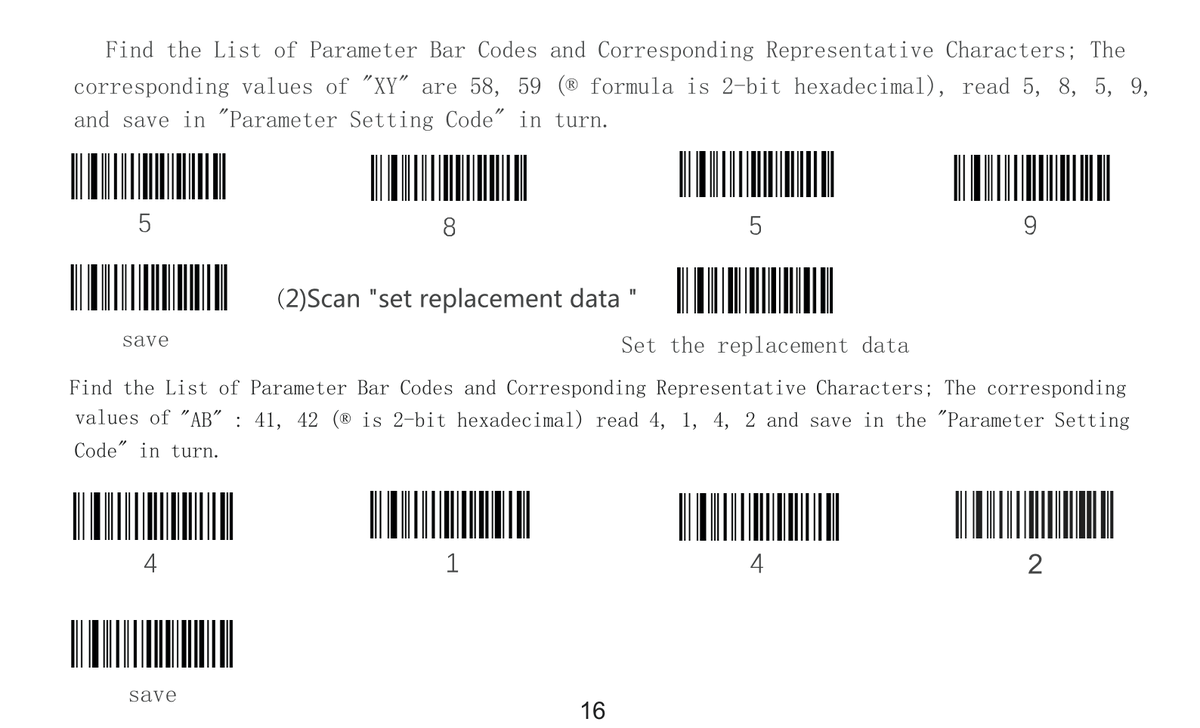 Open / save original page ↗
Text replacement instructions - part 3
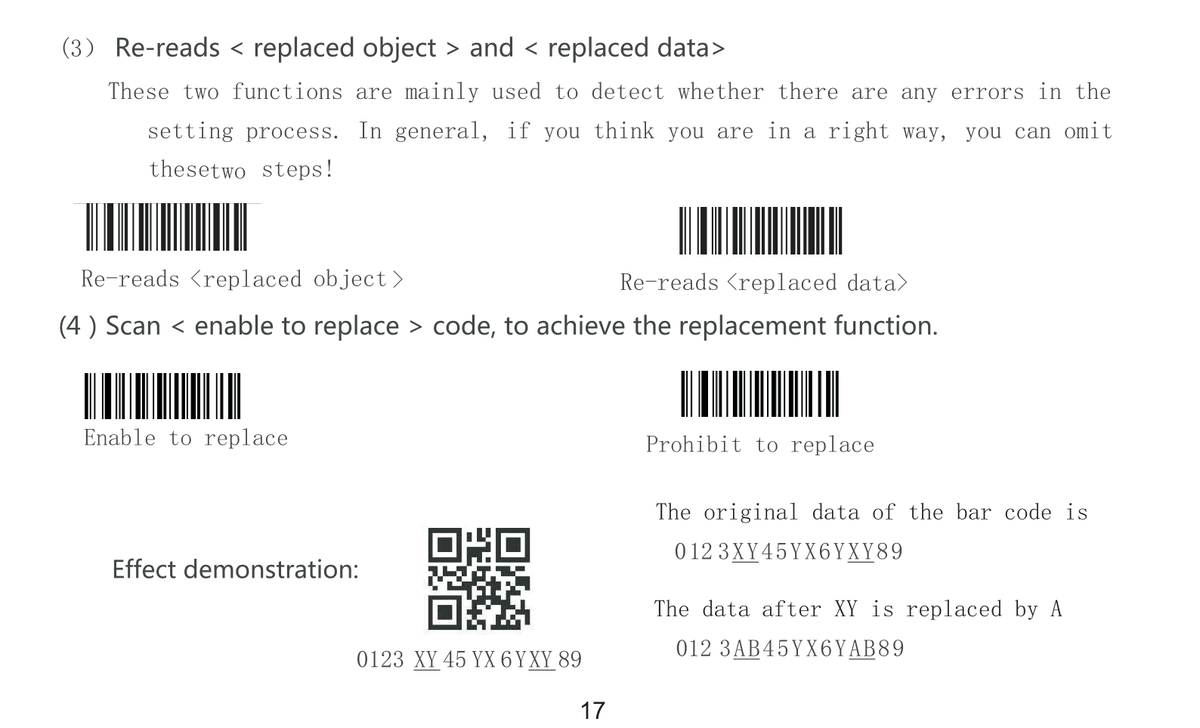 Open / save original page ↗
GS delimiter replacement example - part 1
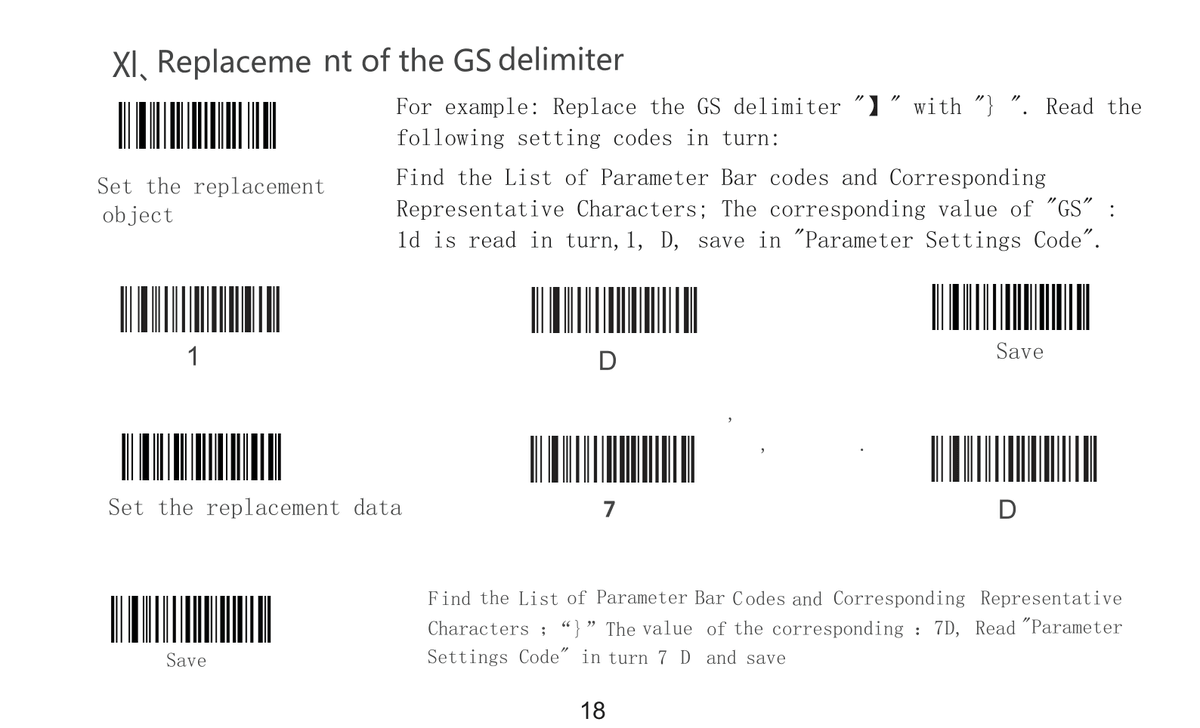 Open / save original page ↗
GS delimiter example and prefix keys
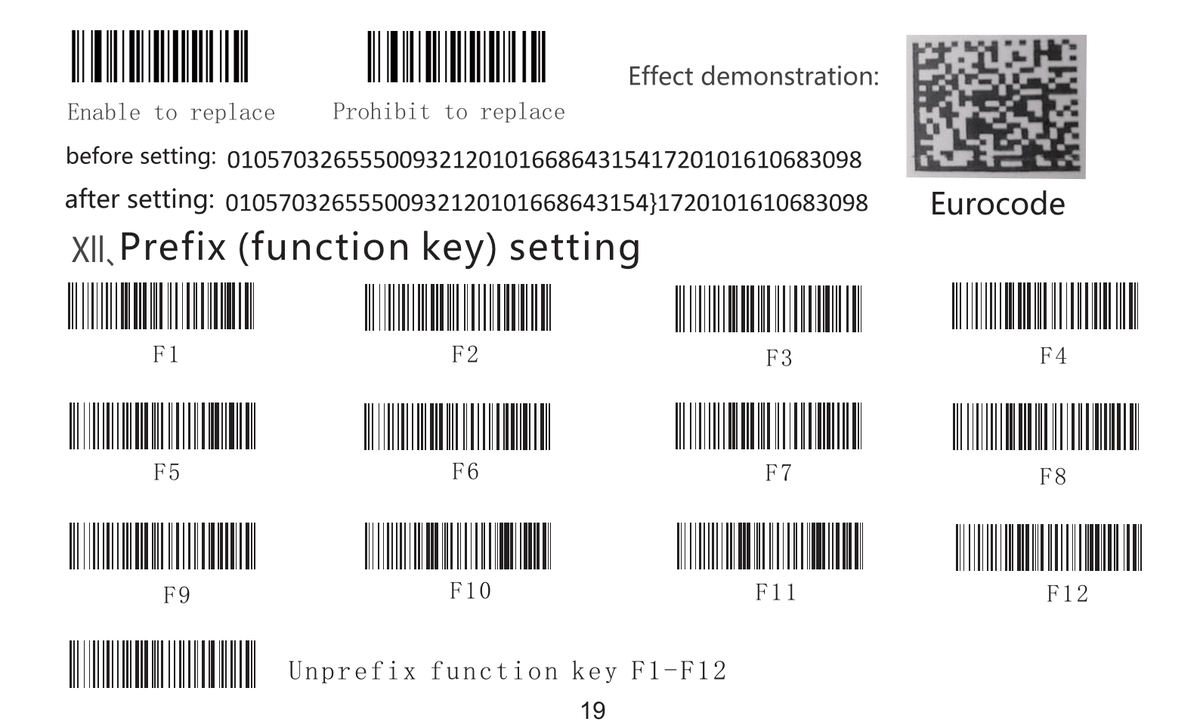 Open / save original page ↗
Hexadecimal character reference
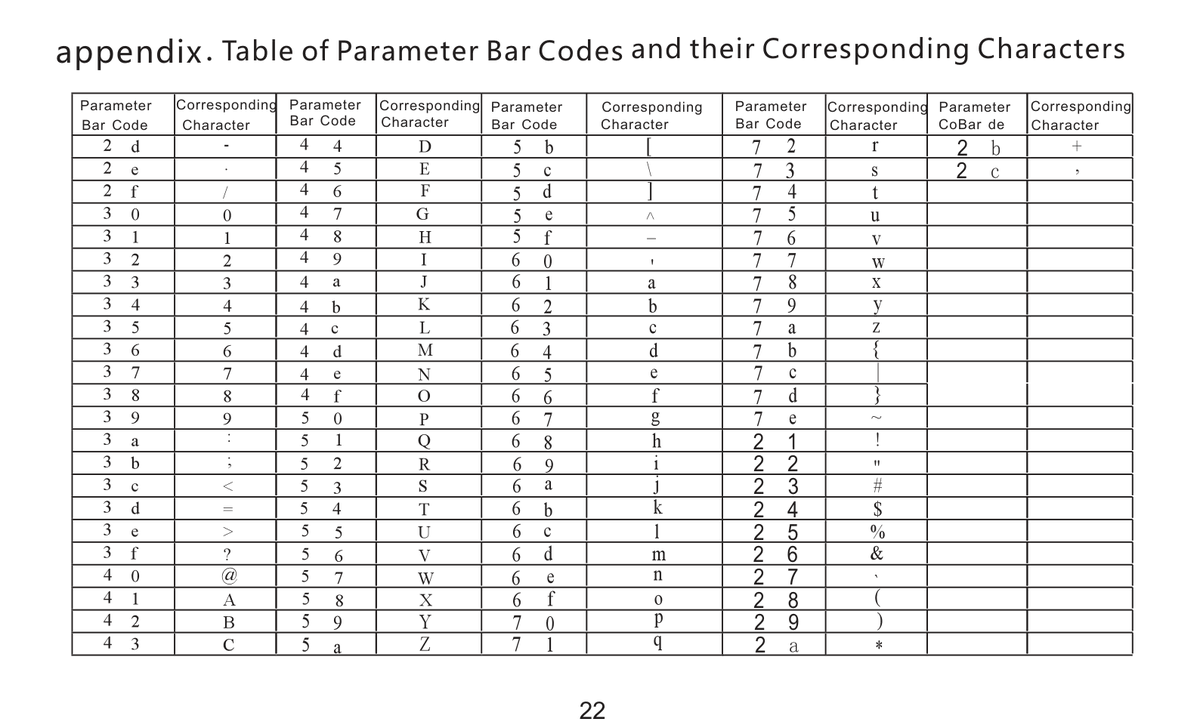 Open / save original page ↗